Posted on Leave a comment

Crystal Wave Quilt

IMG_6621 (2)

This post may contain affiliate links. I may receive commissions from purchases made through links in this post.

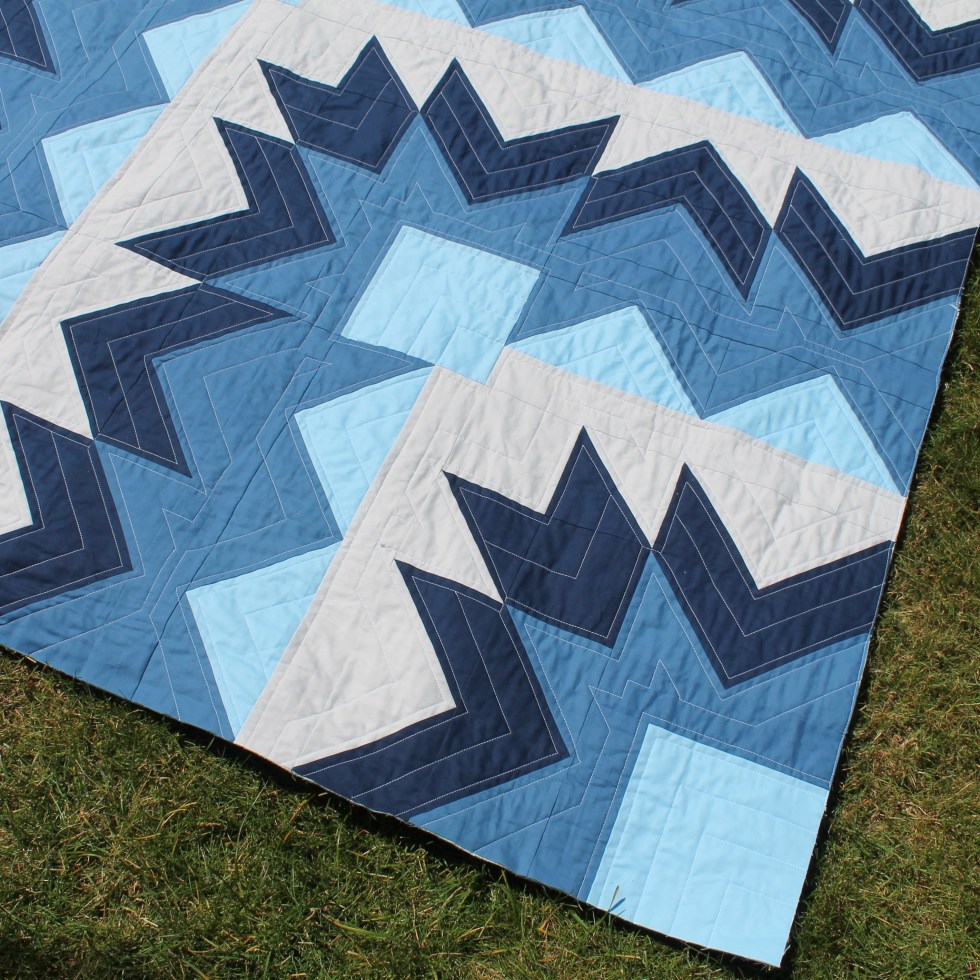
When all you have is girly quilts and you want to give your brother a quilt, you design something special.
Digital PDF (USA)
Digital PDF (International Customers)

PAPER PATTERN

After I drew out this pattern I thought it would be perfect for my Brother. You can make it manly or make it more girly with floral prints. The design reminded me of Ice crystals so that’s where I came up with the name Crystal Wave. I like how the pattern echo’s out and has sharp repeating lines.

This is a 20 inch block quilt, so it goes together super quilt. It’s great for the adventurous beginner to intermediate quilter. This quilt uses my favorite 4 at 1 time no waste flying geese method. So cutting your pieces and sewing a precise 1/4 scant seem is necessary.

I thought Kona Cotton Solids would be great for this quilt. Storm (Dark), Cadet (Medium), Prairie Sky (Light) and Silver (background). It kind of give the quilt an ombre look.

Sometimes a quilt needs a little more than straight line quilting from top to bottom. With this quilt I decided to echo the pattern with 1/4 inch straight line and then about an inch from that. I used my walking foot with it’s guide.

IMG_6290 (2)

I love how a quilt can look so different in different fabrics. Here are some of the quilts my awesome quilt testers made:

cindy price kelly
Cindy Price Kelly
Connie Whan (2)
Connie Whan
Danielle Lawrence
Danielle Lawrence
Linda Cammilleri (2)
Linda Cammilleri
Marg Sharp (2)
Marg Sharpe
Michelle Graham (2)
Michelle Graham
Shawnie (2)
Shawnie Wallace

If you love this quilt pattern and would like to make your own, you can find the Crystal Wave Pattern here!

PAPER PATTERN

Make sure to share your photo’s with the hashtag #crystalwavequilt or #happycloudcreations

Happy Quilting!
Andrea

Posted on 3 Comments

Happy Flower Garden Quilt Along – Week 7 – Corner Tulip Blocks

IMG_6190

Welcome to Week 7 of the Happy Flower Garden Quilt Along! This week we will be making 4 Corner Tulip Blocks (for every size).  It’s not too late to join in the fun! Download your pattern here!

This Corner Tulip Block is super simple and goes together quickly. Make sure you have trimmed all of your Half Square Triangles to the correct size.

You will want to nest your seams so they interlock. To do this, you will press your seams in alternating directions. Then the strips will fit together like a puzzle.

I am loving seeing all of your finished blocks in the Facebook group and on Instagram!Make sure to share your progress photo’s on Instagram with the hashtag #HappyFlowerGardenQA Or Post your photo’s in the Facebook Group!!

I will be filming a LIVE Video Today, Tuesday June 12th at 10:15 am PDT (West Coast USA) in the Facebook Group! I will be going over how to make this Corner Tulip block and answering any questions you have. The video will be saved for later viewing.

Facebook Group!

Quilt Along Schedule:

May 1st – Week 1 – Cut your Fabric
May 8th – Week 2 – Make your Half Square Triangles
May 15th – Week 3 – Make your Flying Geese units
May 22nd – Week 4 – Make your Bottom Rectangle Blocks
May 29th – Week 5 – Make half of your Tulip Blocks
June 5th – Week 6 – Make the other half of your Tulip Blocks
June 12th – Week 7 – Make your Corner Tulip Blocks
June 19th – Week 8 – Make your Star Flower Blocks
June 26th  – Week 9 – Add Sashing and Cornerstones (Finish Star Flower Blocks if needed)
July 3rd – Week 10 – Baste, Quilt and Bind

The pattern will be 15% OFF through the end of the Quilt Along. If you still need your pattern you can download it by clicking below:

Download Today!

Happy Quilting!
Andrea 🙂

Happy Flower Garden Etsy Image

Posted on 6 Comments

Happy Flower Garden QAL – Week 4 – Bottom Rectangle Blocks

IMG_6086 (2)

Welcome to week 4 of the Happy Flower Garden Quilt along! We are getting so close to making some flower blocks! Yay!

This week we will be making our Bottom Rectangle Blocks. Remember all those small square you cut out. Now it’s time to use them. These will give the bottom of our Tulip blocks a more rounded look.

This step will be super quick and easy, giving some extra time for people to catch up if they are a little behind.

Next week we will start making our blocks! Yay! I’m so excited to see everyone’s quilts come together!!

 I will be filming a LIVE Video Tuesday May  at 22nd 10:15 am PDT (West Coast USA) in the Facebook Group! I will be going over how to make the Bottom Rectangle Block and answering any questions you have. The video will be saved for later viewing.

Facebook Group!

Quilt Along Schedule:

May 1st – Week 1 – Cut your Fabric
May 8th – Week 2 – Make your Half Square Triangles
May 15th – Week 3 – Make your Flying Geese units
May 22nd – Week 4 – Make your Bottom Rectangle Blocks
May 29th – Week 5 – Make half of your Tulip Blocks
June 5th  – Week 6 – Make the other half of your Tulip Blocks
June 12th – Week 7 – Make your Corner Tulip Blocks
June 19th – Week 8 – Make your Star Flower Blocks
June 26th  – Week 9 – Add Sashing and Cornerstones (Finish Star Flower Blocks if needed)
July 3rd – Week 10 – Baste, Quilt and Bind

Make sure to share your progress photo’s on Instagram with the hashtag #HappyFlowerGardenQA
Or Post your photo’s in the Facebook Group!!

Download Pattern

Happy Quilting!
Andrea 🙂

Happy Flower Garden Etsy Image

Posted on 7 Comments

Happy Flower Garden QAL – Week 3 – Flying Geese

IMG_6078 (3)

Welcome to Week 3 of our Happy Flower Garden Quilt Along! (Download Pattern) This week we will be making our Flying Geese.

I love using Flying Geese. You can make so many different designs using them. The benefit to using a Flying Geese instead of sewing 2 half square triangles together, is that you don’t have a seam down the middle of your pretty fabric! Less seams equals less sewing! Yay! Each time you make them they get easier and easier.

The Happy Flower Garden Pattern uses the 4 at 1 time no waste method and the 1 at a time method for construction.  You can also download an additional PDF with your pattern that gives you the pieces you need to cut if you decide to make all your flying geese using the 1 at a time method or if you want to use half square triangles instead.

If you have never made the flying geese using the 4 at 1 time method or the 1 at a time method, you may want to try it out first on some scrap fabrics.

Tips for flying geese:
* Go slow when sewing for accurate seams.
* Make sure to read ALL the instructions and look at the diagrams closely
* Finger press your seams open before using your iron.
* Press seams without steam if possible (Dry iron)
* When Pressing, press down with out motion. Moving your iron around a lot can distort your flying geese

I will be filming a LIVE Video Tuesday May 15 th at 10:15 am PDT (West Coast USA) in the Facebook Group! I will be going over how to make your flying geese units and answering any questions you have. The video will be saved for later viewing.

Facebook Group!

Quilt Along Schedule:

May 1st – Week 1 – Cut your Fabric
May 8th – Week 2 – Make your Half Square Triangles
May 15th – Week 3 – Make your Flying Geese units
May 22nd – Week 4 – Make your Bottom Rectangle Blocks
May 29th – Week 5 – Make half of your Tulip Blocks
June 5th  – Week 6 – Make the other half of your Tulip Blocks
June 12th – Week 7 – Make your Corner Tulip Blocks
June 19th – Week 8 – Make your Star Flower Blocks
June 26th  – Week 9 – Add Sashing and Cornerstones (Finish Star Flower Blocks if needed)
July 3rd – Week 10 – Baste, Quilt and Bind

Make sure to share your progress photo’s on Instagram with the hashtag #HappyFlowerGardenQA
Or Post your photo’s in the Facebook Group!!

The pattern will be 15% OFF through the end of the Quilt Along. If you still need your pattern you can download it by clicking below:

Download Pattern

Happy Quilting!
Andrea 🙂

Posted on 6 Comments

Aloha Ripple QAL – Week 3: Half Square Triangles!

IMG_5401

Welcome to week 3 of our Aloha Ripple Quilt Along!!  This week we will be making lots and lots of half square triangles. (Download Pattern)

I love how versatile half square triangles are! You can make so many pretty designs using this basic block.

I like to make my Half Square Triangles with the 2 at 1 time method. If you have a different method you prefer, go for it! I like this method because all your finished edges will be straight grain and not on the bias.

To make the HST 2 at a time, I add 1 1/4 inch to the finished size HST. So our finished throw size HST will be 5 inches finished, so 5 + 1 1/4= 6 1/4 inches.
I like to give you plenty of wiggle room for when you are trimming your HST down to the correct size.

All of the 6 1/4 inch Main color squares will match up with 1 Background color square of the same size. (See the Aloha Ripple Quilt Pattern for amounts).

With right sides of fabric facing each other, lay one square on top of the other. Draw a line from one corner to the other diagonally. You will then sew a scant 1/4 from the seam on both sides. (Since this size square gives you plenty of wiggle room a regular 1/4 seam would work, I have you sewing a scant 1/4 inch seam, so the whole pattern is consistent.)
Cut down the center, Set your seams with your iron, finger press them open and then press open. SEE BELOW.
IMPORTANT – You will need to then trim down all of your half square triangles to the correct size. The throw size will be 5 1/2 inches. You will want to make sure to line your center seam up with the 45 degree angle on your ruler to insure that your points line up when sewing.

Since trimming the half square triangles can take a long time, next week we will have a super quick and easy block! You can start trimming the HST’s this week and finish trimming the remaining ones next week.

LIVE VIDEO: Join me today (Tuesday Jan 30th) at 10:15 am PST (West Coast USA) for a LIVE video in the Facebook Group to go over tips and answer any questions.

Make sure to share a photo of this weeks step on social media with the hashtag #AlohaRippleQAL or join the Facebook Group and post a photo of all your half square triangles!

Join the Facebook Group

Download Pattern

Next week we will make our first block, the Center Block!

Here is the full Quilt Along Schedule:

Starting January 2nd: Download Pattern – Select your fabric and post a photo!
Week 1: January 16th: Cut fabric
Week 2: January 23rd: Make the Flying Geese
Week 3: January 30th: Make the Half Square Triangles
Week 4: February 6th: Make the Center Block (1)
Week 5: February 13th: Make Corner Blocks A (2)
Week 6: February 20th: Make Corner Blocks B (2)
Week 7: February 27th: Make the Stacked Flying Geese blocks (4)
Week 8: March 6th: Assemble your Quilt Top
Week 9: March 13th: Baste, Quilt and Bind your Quilt!

Happy Quilting!
Andrea

Posted on 11 Comments

Aloha Ripple Quilt Along – Week 1: Cut Fabric

IMG_5370 (2)

Welcome to the first week of the Aloha Ripple Quilt Along! Hopefully you have all your fabrics picked out and are ready to start cutting!

If you still need to download your FREE pattern click here!

Things you will need:

  • Rotary Cutter
  • Acrylic Ruler
  • Cutting Mat
  • Paper
  • Pen
  • Pins

When I make a quilt I like to cut all my pieces up front and label them to keep organized. Make sure you have a nice sharp blade for your Rotary cutter.

*Measure twice – Cut once*

I know everyone says it, but it’s true. You don’t want to rush your cutting and end up cutting your pieces too small.  You want to make sure you have plenty of fabric for the whole quilt.

When you cut out your pieces you will want to cut out the largest pieces first. Then cut the smaller pieces. This will ensure that you have enough fabric.

I like to take a little piece of paper and write the color and size on it and pin it to the stack of fabric. Since some of the sizes are very close, this helps me sew the correct pieces together.

Once they are all cut I like to stack them in a Gallon size Ziplock bag. That way I don’t loose any of my pieces.

IMG_5371 (2)

Make sure to read through ALL of the Basic instructions before starting your quilt. I’ve added instructions on how to test your scant 1/4 inch seam inside the basic instructions. Most quilt patterns require a scant 1/4 inch seam, they just don’t mention it. This 1/4 scant accounts for the little bit of fabric that is take up when you fold and press your seams open.

You will also want to look through the whole pattern to wrap the construction around your head before you start. You may need to cut your fabric differently if you want to make your flying geese or half square triangles with a different method than is listed in the pattern.

I like to go through all the steps and write in my color choices, so it’s less confusing when I get to those steps. You can also go through with a highlighter and mark the instructions for the size you are making, since the instructions are for baby, throw and queen size.

You could also tape pieces of your actual fabric to a pieces of paper and label it for reference.

Join me today at 10:15 am PST (West Coast USA) for a LIVE video in the Facebook Group to go over tips and answer any questions.

Make sure to share a photo of this weeks step on social media with the hashtag #AlohaRippleQAL or join the Facebook Group and post a photo!

Join the Facebook Group

Download Pattern

Next week we will be making our Flying Geese units! We will be using the 1 flying geese at a time method and the 4 at 1 time no waste method.

Here is the full Quilt Along Schedule:

Starting January 2nd: Download Pattern – Select your fabric and post a photo!
Week 1: January 16th: Cut fabric
Week 2: January 23rd: Make the Flying Geese
Week 3: January 30th: Make the Half Square Triangles
Week 4: February 6th: Make the Center Block (1)
Week 5: February 13th: Make Corner Blocks A (2)
Week 6: February 20th: Make Corner Blocks B (2)
Week 7: February 27th: Make the Stacked Flying Geese blocks (4)
Week 8: March 6th: Assemble your Quilt Top
Week 9: March 13th: Baste, Quilt and Bind your Quilt!

Happy Quilting!
Andrea

Posted on Leave a comment

Pacific Northwest Plaid Quilt

PacificNorthwestPlaidQuilt (2)
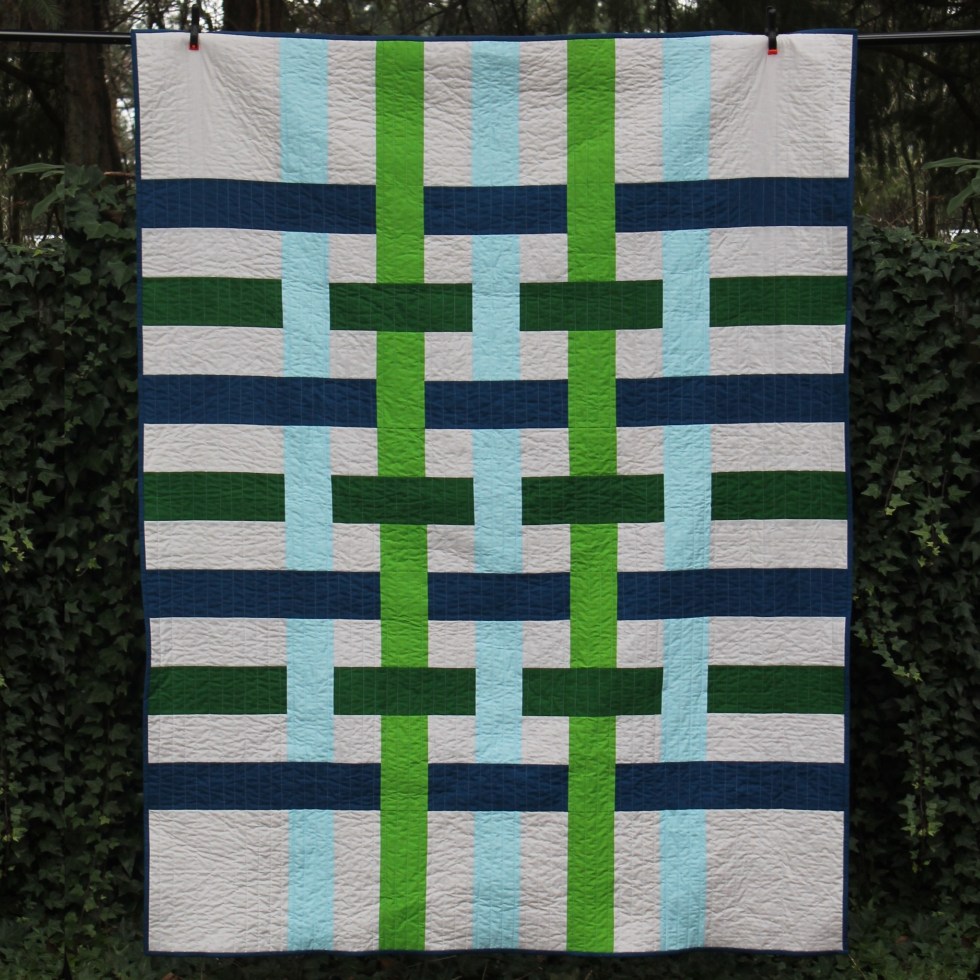
Yay! My Pacific Northwest Plaid Quilt pattern is all finished! I’m super happy with how it turned out!  You can find this quilt pattern in my shop!
DIGITAL DOWNLOAD
PAPER PATTERN
Etsy shop (For customers outside USA)


Earlier this year I gifted my parents one of my Snowy Day Quilt Samplers for their anniversary! After I gave it to them I realized it would be hard for them to share it. My Mom claimed it haha! So I decided I would make my Dad his own quilt.

Growing up my Dad used to always wear those cozy Flannel plaid shirt/coats. So I really wanted to try to design a quilt resembling plaid! Once my design was picked, I went to my trusty Kona Color Card to find the perfect colors. We live in the Pacific Northwest of Washington State. We are surrounding by oceans, lakes, rain (lots and lots of rain), evergreen trees and green grass. So I decided to go with blues and greens and a little bit of silver.  It just so happens that our local sports teams fashion the same colors! Go Seahawks!

From left to right: (All Kona Cotton) Silver, Lake, Jungle, Prussian, and Parrot

pnwfabric

This quilt went together very quickly! The quilt is full of square and rectangles, so once your fabric is cut, it’s block making time. If you are looking for a quilt to make in a weekend, this one’s for you!

I decided to go with a straight line quilting about 1 inch apart. I like the texture it gives once the quilt is washed and dried.

You can find this quilt pattern in my Craftsy and Etsy shops!!

DIGITAL DOWNLOAD
PAPER PATTERN

Etsy (For customer outside the USA. Etsy collect the correct amount of tax and send it to the government.)

I can’t wait to see your version of this quilt!! On social media use the hashtags #pacificnorthwestplaidquilt or #happycloudcreations

Have a wonderful day!

Andrea


Posted on 3 Comments

Happy Flower Garden Quilt

IMG_4455 (2)

Digital Pattern (USA)
Digital Pattern (International)

Who loves flowers? Well, I love flowers, but I do NOT have a green thumb. Even though I should have a green thumb. I took Horticulture and Landscaping classes in High School. I know what I’m supposed to do, but I’d rather be inside sewing. I know it sounds bad, but it is true.

When I started designing my Happy Flower Garden Quilt, it was actually a totally different design. And then I though ‘Hey, that looks like the top of a flower’. So I took that shape and made it into some tulip looking blocks. Since I love flowers so much, I thought this would be the perfect quilt for myself! I’ve been wanting to make myself a quilt for awhile, I just hadn’t picked the right pattern yet.
I have been hoarding some Macramé Fabric by Rashida Coleman-Hale for Cotton + Steel Fabrics. I thought this would be the perfect time to use some of this gorgeous fabric.

IMG_4344 (3)

I love how it turned out and am happy I finally cut into this beautiful fabric. I decided to go with a wavy line quilting. I usually go with straight line quilting. First I drew a wavy line from the top to the bottom of my quilt with a water soluble fabric marker. Then I started quilting from the top to the bottom of the quilt. I adjusted my walking foot guide to 1 inch and went along my first quilting wave. It’s not perfect, but I love it! One of my favorite parts is the bright pink backing!

IMG_4353

So if you like flowers too, then this quilt pattern is perfect for you too! It comes with directions for a baby/crib size and throw size quilt. This pattern is great for the adventurous beginner to intermediate. It has a lot of different pieces so keeping organized is key. I like to write my sizes on a little piece of paper and pin it to the stack of corresponding pieces.

IMG_4362

When I tested out my Baby Size quilt I decided to go for a floral sashing! I love this June Bug fabric by Dear Stella Fabric! I can’t wait to finish this one!

IMG_20170530_132757_548

This would be a great quilt to make for a new summer baby or a throw size for a graduate!

You can get your copy of the pattern here:
Digital Pattern (USA)
Digital Pattern (International)

Happy Quilting!
Andrea

Find this Baby size quilt in my shop:

IMG_8026 (2).JPG

Posted on Leave a comment

The Beauty of Solids

IMG_4364 (2)
Let me tell you a secret. I used to think Solid colored fabric was SO boring!!! I never purchased solids for my quilts or projects. I’d use a dot fabric or a fabric with a white on white pattern.

And then I joined Instagram. I saw all these gorgeous quilts that had solids in them! They looked so balanced, not too busy and so so pretty!

So I decided I’d go out of my comfort zone and make an all solids quilt! Yes ALL solids!! Crazy huh! I found the perfect pattern, a Tetris quilt for my husband. I loved how it turned out so much! The Kona Cotton fabric by Robert Kaufman is so vibrant!

Tetris Quilt

Solids can help balance out your quilt and showcase the block designs. If you have too many busy prints the design can get lost.

So I had some left over solids from my Tetris quilt and I decided to test out my Stepping Stone Quilt pattern with the solids too. I love how it turned out too!

IMG_4767 (2)

I bound it with a Black with White dash fabric called Thicket by Gingiber for Moda and the backing fabric is made by Riley Blake. This quilt is listed for sale in my Etsy shop here.


IMG_3309

Then I saw this awesome fabric from Arrow Flight by  Michael Miller fabric and got inspired to make the front of my quilt mimic the backing fabric.

IMG_3996

So I came up with my super easy Colorful tiles quilt pattern.

colorful tiles quilt

This Colorful tiles quilt is also listed for sale in my Etsy shop here.

I used the Kona Cotton by Robert Kaufman Color chart to help pick some of the solids for the front of this quilt.

color chart

This color charts is super awesome! It’s great for picking out backing fabric and coordinating solids. You can buy one online from a variety of quilt fabric shops. What’s also cool, is this color chart matches up with all of the Kona Cotton fabric sold a Joann Fabric Stores online and in store

If an all solids quilt isn’t for you. You can try to mix more solids in with your quilt to help the pattern pop. Like in my X Marks the spot quilt. The white fabric makes the design pop. You can find the pattern here.

IMG_4742 (2)

So if you haven’t made an ALL solids go try it!! Or at least try adding some solids to your next quilt, I’m sure you will love it!!

Happy Quilting!
Andrea