Posted on 5 Comments

Aloha Ripple QAL – Week 4: Center Block

IMG_5410

Welcome to the 4th week of our Aloha Ripple Quilt Along! I hope you are having a lot of fun sewing along. Now that all of our components are done, it’s time to start making our blocks!! This is my favorite part of quilting. Putting all the pieces together like a puzzle.

This week we will be making the center block of our quilt. The center block is a square in square quilt block. This block goes together super quickly so you will have plenty of time to finish up trimming the half square triangles from last week. This will also give all of you that just joined time to catch up!

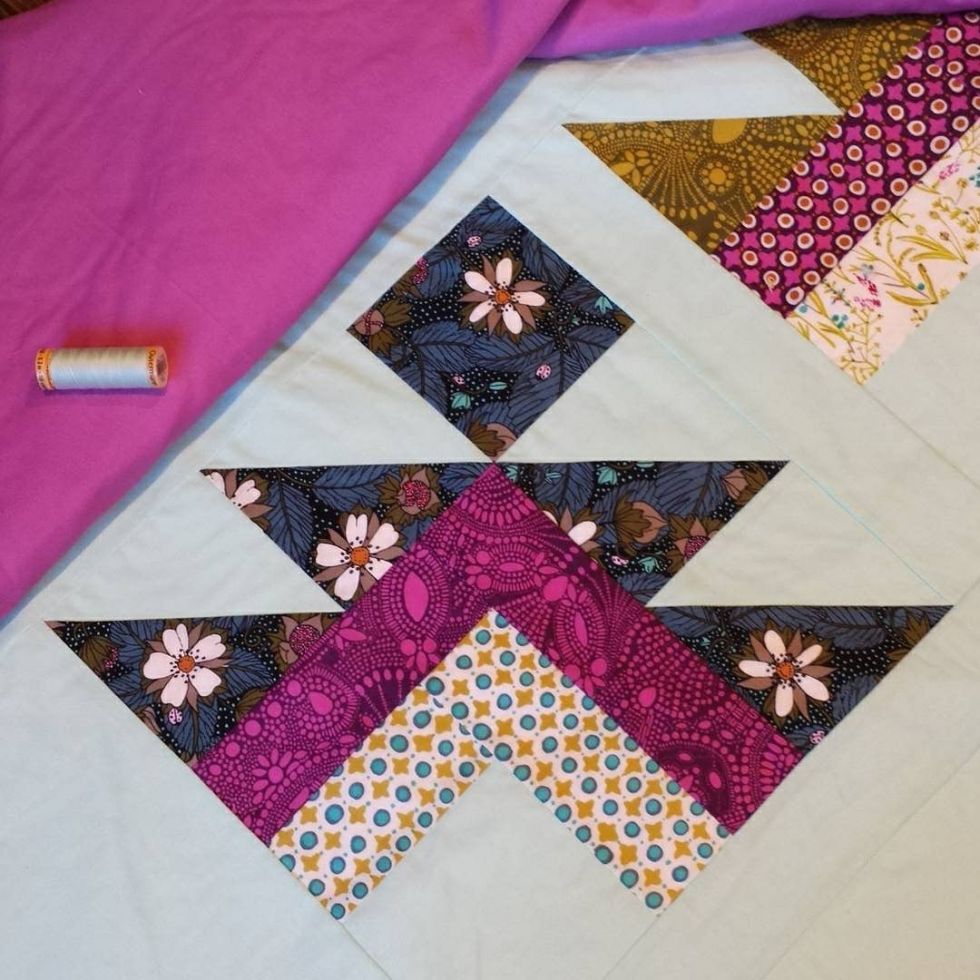
Making the Center Block

Please refer to the pattern to find your exact piece sizes. I like to use the stitch and flip method for this block. When making the block this way you don’t have to worry about using triangles cut on the bias.

First you will lay two small squares on top of your large square on opposite corners (with right sides of fabric facing each other).
Mark a line diagonal from one corner to the other on each small square. Stitch right next to the drawn line toward the outer side. Trim off your corner, leaving a 1/4 inch from the seam. Press toward the attached triangles.

Next you will place the other two small squares on the opposite corners. Mark a line diagonal from one corner to the other on each square. Stitch right next to the drawn line. Trim off your corner, leaving a 1/4 inch from the seam. Press toward the attached triangles.

This block is a great way to frame a pretty floral or to fussy cut a cute image. I can’t wait to see all of your blocks!!

LIVE VIDEO: Join me today (Tuesday Feb. 6th) at 10:15 am PST (West Coast USA) for a LIVE video in the Facebook Group to go over tips and answer any questions.

Make sure to share a photo of this weeks step on social media with the hashtag #AlohaRippleQAL or join the Facebook Group and post a photo of  your center block!
You can follow me on Instagram here: Instagram.com/HappyCloudCreations

Join the Facebook Group

If you haven’t downloaded the FREE Aloha Ripple Quilt Pattern yet, you can find it here:

Download Pattern

Next week we will make our Corner Block A!

Here is the full Quilt Along Schedule:

Starting January 2nd: Download Pattern – Select your fabric and post a photo!
Week 1: January 16th: Cut fabric
Week 2: January 23rd: Make the Flying Geese
Week 3: January 30th: Make the Half Square Triangles
Week 4: February 6th: Make the Center Block (1)
Week 5: February 13th: Make Corner Blocks A (2)
Week 6: February 20th: Make Corner Blocks B (2)
Week 7: February 27th: Make the Stacked Flying Geese blocks (4)
Week 8: March 6th: Assemble your Quilt Top
Week 9: March 13th: Baste, Quilt and Bind your Quilt!

Happy Quilting!
Andrea


Posted on 6 Comments

Aloha Ripple QAL – Week 3: Half Square Triangles!

IMG_5401

Welcome to week 3 of our Aloha Ripple Quilt Along!!  This week we will be making lots and lots of half square triangles. (Download Pattern)

I love how versatile half square triangles are! You can make so many pretty designs using this basic block.

I like to make my Half Square Triangles with the 2 at 1 time method. If you have a different method you prefer, go for it! I like this method because all your finished edges will be straight grain and not on the bias.

To make the HST 2 at a time, I add 1 1/4 inch to the finished size HST. So our finished throw size HST will be 5 inches finished, so 5 + 1 1/4= 6 1/4 inches.
I like to give you plenty of wiggle room for when you are trimming your HST down to the correct size.

All of the 6 1/4 inch Main color squares will match up with 1 Background color square of the same size. (See the Aloha Ripple Quilt Pattern for amounts).

With right sides of fabric facing each other, lay one square on top of the other. Draw a line from one corner to the other diagonally. You will then sew a scant 1/4 from the seam on both sides. (Since this size square gives you plenty of wiggle room a regular 1/4 seam would work, I have you sewing a scant 1/4 inch seam, so the whole pattern is consistent.)
Cut down the center, Set your seams with your iron, finger press them open and then press open. SEE BELOW.
IMPORTANT – You will need to then trim down all of your half square triangles to the correct size. The throw size will be 5 1/2 inches. You will want to make sure to line your center seam up with the 45 degree angle on your ruler to insure that your points line up when sewing.

Since trimming the half square triangles can take a long time, next week we will have a super quick and easy block! You can start trimming the HST’s this week and finish trimming the remaining ones next week.

LIVE VIDEO: Join me today (Tuesday Jan 30th) at 10:15 am PST (West Coast USA) for a LIVE video in the Facebook Group to go over tips and answer any questions.

Make sure to share a photo of this weeks step on social media with the hashtag #AlohaRippleQAL or join the Facebook Group and post a photo of all your half square triangles!

Join the Facebook Group

Download Pattern

Next week we will make our first block, the Center Block!

Here is the full Quilt Along Schedule:

Starting January 2nd: Download Pattern – Select your fabric and post a photo!
Week 1: January 16th: Cut fabric
Week 2: January 23rd: Make the Flying Geese
Week 3: January 30th: Make the Half Square Triangles
Week 4: February 6th: Make the Center Block (1)
Week 5: February 13th: Make Corner Blocks A (2)
Week 6: February 20th: Make Corner Blocks B (2)
Week 7: February 27th: Make the Stacked Flying Geese blocks (4)
Week 8: March 6th: Assemble your Quilt Top
Week 9: March 13th: Baste, Quilt and Bind your Quilt!

Happy Quilting!
Andrea

Posted on Leave a comment

Pointed Quilt

IMG_4976 (3)Yay! My Pointed Quilt is done! I’ve been seeing a lot of quilts turned on-point and I thought it would be awesome to try to make one myself.

Paper Pattern
Digital Download (USA)
Digital Download (International)

I was trying to design a block that was Fat Quarter friendly. This block is similar to my block 7 of the Snowy Day Quilt Sampler. The block in my Pointed quilt is a little smaller and turned on-point!

Since this block uses different size pieces through out, you must make sure to use an accurate scant 1/4 inch seam. This will ensure that all of your pieces line up correctly.

You can make sure you are using a scant 1/4 inch seam by taking 3 –  2 1/2 x 4 inch strips. Sew them all together lengthwise. The center strip will measure 2 inches wide finished, if you are using a scant 1/4 inch seam.

scant fourth inch

I have been trying to decide on a pattern to use this beautiful Garden Secrets fabric by Sarah Watson for Cloud9 Fabrics. After I drew up my pattern I thought this fabric line would be perfect.

The math for a on-point quilt is a little different than a regular quilt. Once I got my mind wrapped around the idea. It was go time! The quilt goes together pretty quickly.

pointed quilt andrea 2

Once my quilt was all finished I decided to go with a beautiful purple backing fabric. This fabric is Kona Cotton in Gumdrop by Robert Kaufman. I like to use my Kona Color chart to pick out the perfect shade of fabric.

I also found the perfect shade of Cotton Gutterman thread that matches the Ice Frappe Background fabric.

pointed quilt andrea

I decided to quilt this to mimic the points. I usually opt for a straight line quilting, which is much faster. This one took more time, but was totally worth it. I love how it turned out!

IMG_4980 (3)

In an effort to use up my stash, I decided to go with a scrappy binding! I used two fat quarters of the dash print and some scraps of a couple of the other light colored fabrics.20171007_154017

You can download the pattern today!!

PAPER PATTERN

Make sure to use the hashtag #pointedquilt

Happy Quilting!
Andrea

Here are some made by my awesome testers!!

marg sharpe for listingBrittany listing

Cindy (2) listingcindy price kelley (2) listingRoseMassey (2) listingVickie Riches (2) listing