Yay! It’s week 5 of the Frame It Quilt Along! This week we will be finishing 4 of our blocks (If you are making the Throw size, adjust according to what size you are making).
Make sure to square up your block after each step.
Check the beginning and end of your seam, make sure they are a consistent scant 1/4 inch seam all the way across.
Finger press your seams open, then press with your iron.
JOIN ME for a LIVE Video today (March 12, 2019) at 10:00 am PDT (West Coast USA). I will be going over how to finish our quilt blocks. I will also be answering any questions you have! If you can’t join me LIVE, the video will be saved to the Facebook Group, it will be available on Instagram for 24 hours and I will upload it to my YouTube channel.
Join the Quilt Along by posting your progress photo’s on Instagram with the hashtag #FrameItQAL
OR Join the Facebook Quilt Along Group and post your progress photo there!!
First you will want to decide which version you will be making:
The main pattern
Half square triangle method (uses more background fabric)
Stitch and flip method (uses more main fabric and background fabric)
I recommend trying the Main pattern instructions with some scrap fabric before deciding on which method you want to use.
Tips for this week:
Read ALL instructions
Be gentle with the cut triangles
Sew slowly
Square up the finished Square in Square unit to the specified size. When squaring up the block measure 4 1/4 inch from the center of the block.
JOIN ME for a LIVE Video tomorrow (March 6, 2019) at 10:15 am PST (West Coast USA). I will be going over all 3 methods of making the Square in Square unit. I will also be answering any questions you have! If you can’t join me LIVE, the video will be saved to the Facebook Group, it will be available on Instagram for 24 hours and I will upload it to my YouTube channel.
Join the Quilt Along by posting your progress photo’s on Instagram with the hashtag #FrameItQAL
OR Join the Facebook Quilt Along Group and post your progress photo there!!
Welcome to week 3 of the Frame It Quilt Along! The first two weeks of the quilt along were dedicated to pick out our fabrics! This week we will be cutting out our pieces.
I bought this beautiful bundle from Southern Fabrics! I was going to go with Kona Cotton in Silver, one of my usual background fabrics. But I thought it would have better contrast and make the prints pop better if I went with Kona Cotton in Iron.
Tips for cutting your pieces:
If you are cutting from yardage, I recommend cutting your largest pieces out first. Then cut the smaller pieces out next. This will insure that you have enough fabric for the whole quilt.
If you are using Fat Quarters, check out the cutting diagram in the pattern.
If you are making the Baby size you will be cutting out less pieces from each fat quarter than you would be if you are making the Throw, Twin, Queen or King size.
And as always, measure twice and cut once!
LIVE VIDEO
Join me for the Live Video today (Feb. 26th) at 10 am PST (West Coast USA). If you can’t watch Live, the video will be saved in my Facebook group. It will also be available for 24 hours on Instagram. After that I will upload it to my YouTube channel.
Join the quilt along fun by posting a progress photo on Instagram with the hashtag #FrameItQAL
or post a progress photo in the Happy Cloud Creations Quilt Along Group!
Quilt Along Schedule: Feb. 12 – Week 1-2: Get Pattern and Pick out Fabrics
Feb. 26 – Week 3: Cut out our pieces
Mar. 5 – Week 4: Make Center Units (Square in Square Blocks) (Steps 1-4)
Mar. 12 – Week 5: Finish 4 Blocks
Mar. 19 – Week 6: Finish 4 Blocks
Mar. 26 – Week 7: Finish 4 Blocks
Apr. 2 – Week 8: Add Sashing and Finish Quilt
I asked in my Quilt Along Group which pattern everyone would like to make next as a quilt along and the majority voted for my Frame It Quilt Pattern. I love the modern look of this pattern!
What you will get: Both versions will come with the Main pattern and 2 supplementals. One supplemental will give you directions how to make the square in square blocks with Half Square Triangles. The second will give you directions how to make the square in square block with the Stitch and Flip method.
The main pattern uses triangles cut on the bias. So I thought I’d give these two other options for those that are worried about sewing triangles.
I found that if you are gentle with your fabric and sew slowly, you shouldn’t have a problem with sewing the triangles on the bias. For extra help you can starch your fabric before cutting.
Quilt Size: Throw – 56 x 74 inches (12 blocks)
I will be making the Throw size, but you can choose which ever size you would like and adjust how many blocks you will finish in weeks 5 – 7. These sizes are also in the pattern: Baby (4 blocks), Twin (20 blocks), Queen (30 blocks) and King (36 blocks)
Quilt Along Schedule:
Feb. 12 – Week 1-2: Get Pattern and pick out fabrics
Feb. 26 – Week 3: Cut our pieces
Mar. 5 – Week 4: Make center units (Square in Square Block) (Step 1 – 4)
Mar. 12 – Week 5: Finish 4 Blocks
Mar. 19 – Week 6: Finish 4 Blocks
Mar. 26 – Week 7: Finish 4 Blocks
Apr. 2 – Week 8: Add sashing and Finish Quilt
Each week I will have a LIVE video to go over that weeks step and answer any questions you have! You will be able to view my LIVE videos in my Facebook Quilt Along Group: Happy Cloud Creations Quilt Alongs OR my Instagram.
After the video is done, I will upload it to my YouTube page for easy access!
Since I have received a lot of requests for the Fabric Requirements early, you can download them now! Make sure to decided which way you would like to make the blocks. The main pattern, half square triangle and stitch and flip versions all have slightly different fabric requirements.
If you like to pre-wash your fabric or if you are worried about miss cutting, but a little extra!
Earlier this year I gifted my parents one of my Snowy Day Quilt Samplers for their anniversary! After I gave it to them I realized it would be hard for them to share it. My Mom claimed it haha! So I decided I would make my Dad his own quilt.
Growing up my Dad used to always wear those cozy Flannel plaid shirt/coats. So I really wanted to try to design a quilt resembling plaid! Once my design was picked, I went to my trusty Kona Color Card to find the perfect colors. We live in the Pacific Northwest of Washington State. We are surrounding by oceans, lakes, rain (lots and lots of rain), evergreen trees and green grass. So I decided to go with blues and greens and a little bit of silver. It just so happens that our local sports teams fashion the same colors! Go Seahawks!
From left to right: (All Kona Cotton) Silver, Lake, Jungle, Prussian, and Parrot
This quilt went together very quickly! The quilt is full of square and rectangles, so once your fabric is cut, it’s block making time. If you are looking for a quilt to make in a weekend, this one’s for you!
I decided to go with a straight line quilting about 1 inch apart. I like the texture it gives once the quilt is washed and dried.
You can find this quilt pattern in my Craftsy and Etsy shops!!
(Pattern Download is at the bottom of this blog post)
This post may contain affiliate links. I may receive commissions from purchases made through links in this post.
Are you looking for a quick an easy quilt? Maybe you have a baby shower coming up. Or you have a son or daughter going to college soon and you want to give them a special gift. Well, this Arrows Away Quilt is perfect for making a super quick, easy and modern quilt!
The first time I made this quilt, was about a year ago. I love using big blocks! It makes the quilt go together super quick. Also, you can show of gorgeous big prints.
The first throws size version was slightly smaller than the pattern. After research, I found out more people prefer larger size throw than my original version. My research also showed people prefer a rectangle shaped quilt over a square size quilt. So I added a strip of sashing to the top and bottom of the original design to make it more of a rectangle.
Let me tell you a secret. I used to think Solid colored fabric was SO boring!!! I never purchased solids for my quilts or projects. I’d use a dot fabric or a fabric with a white on white pattern.
And then I joined Instagram. I saw all these gorgeous quilts that had solids in them! They looked so balanced, not too busy and so so pretty!
So I decided I’d go out of my comfort zone and make an all solids quilt! Yes ALL solids!! Crazy huh! I found the perfect pattern, a Tetris quilt for my husband. I loved how it turned out so much! The Kona Cotton fabric by Robert Kaufman is so vibrant!
Solids can help balance out your quilt and showcase the block designs. If you have too many busy prints the design can get lost.
So I had some left over solids from my Tetris quilt and I decided to test out my Stepping Stone Quilt pattern with the solids too. I love how it turned out too!
I bound it with a Black with White dash fabric called Thicket by Gingiber for Moda and the backing fabric is made by Riley Blake. This quilt is listed for sale in my Etsy shop here.
This Colorful tiles quilt is also listed for sale in my Etsy shop here.
I used the Kona Cotton by Robert Kaufman Color chart to help pick some of the solids for the front of this quilt.
This color charts is super awesome! It’s great for picking out backing fabric and coordinating solids. You can buy one online from a variety of quilt fabric shops. What’s also cool, is this color chart matches up with all of the Kona Cotton fabric sold a Joann Fabric Stores online and in store
If an all solids quilt isn’t for you. You can try to mix more solids in with your quilt to help the pattern pop. Like in my X Marks the spot quilt. The white fabric makes the design pop. You can find the pattern here.
So if you haven’t made an ALL solids go try it!! Or at least try adding some solids to your next quilt, I’m sure you will love it!!
I love the simplistic design in my Colorful Tiles quilt. I had drawn out this design a while back after I had purchased this awesome backing fabric from the Arrow Flight collections by Michael Miller fabrics. The backing fabric gave me the idea for the front design.
After I had drawn up this quilt design, I thought, this would be a great pattern for a beginner! I know some new quilters are a little scared of using triangles. I thought this was a great spin on the basic sew a bunch of squares together quilt top. This quilt pattern has color diagrams with step by step instructions for piecing your quilt top, piecing your backing fabric, making your binding and attaching your binding.
I quilted this quilt in the ‘organic’ straight line quilting, that I love to do! It’s quick and easy. My sewing machine didn’t come with a walking foot, so I had to purchase it separately. I start out by using one of my long seams as a guide. I line my foot up on a middle seam, and quilt from the top to the bottom. Then I set the guide that came with my walking foot to about 1 inch (some quilts I go bigger). I quilt using my guide from my center of my quilt outward. I really love the texture the 1 inch quilting gives my quilts.
I also like to use cotton batting to give it that extra crinkle once it’s washed and dried.
Whenever I make a quilt pattern I like to test each size the pattern makes. This is my Throw size tester quilt top.
It has ended up in my finished quilt top pile and has not been finished yet. Hopefully I can work on that pile next month!! I used a variety of Cotton+Steel fabrics for my throw size quilt.
I love this pattern because it was very quick and easy! It went together in a day!


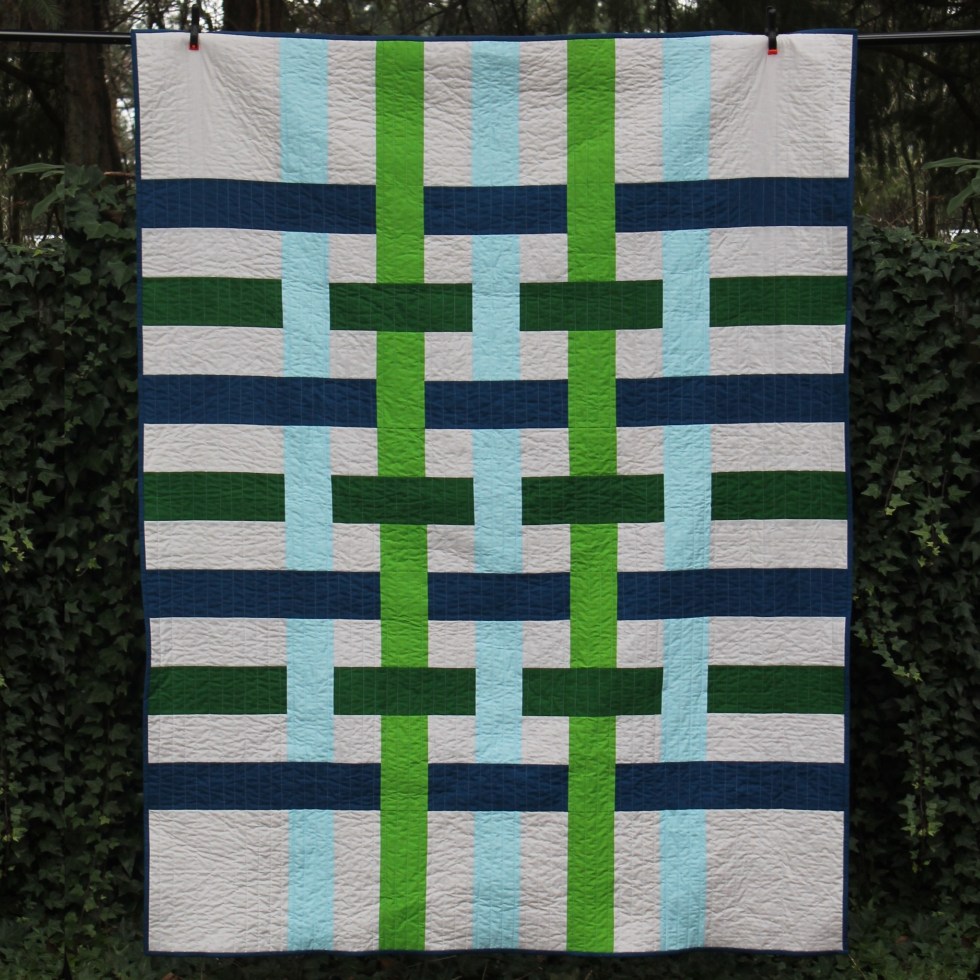 Yay! My Pacific Northwest Plaid Quilt pattern is all finished! I’m super happy with how it turned out! You can find this quilt pattern in my shop!
")
")


