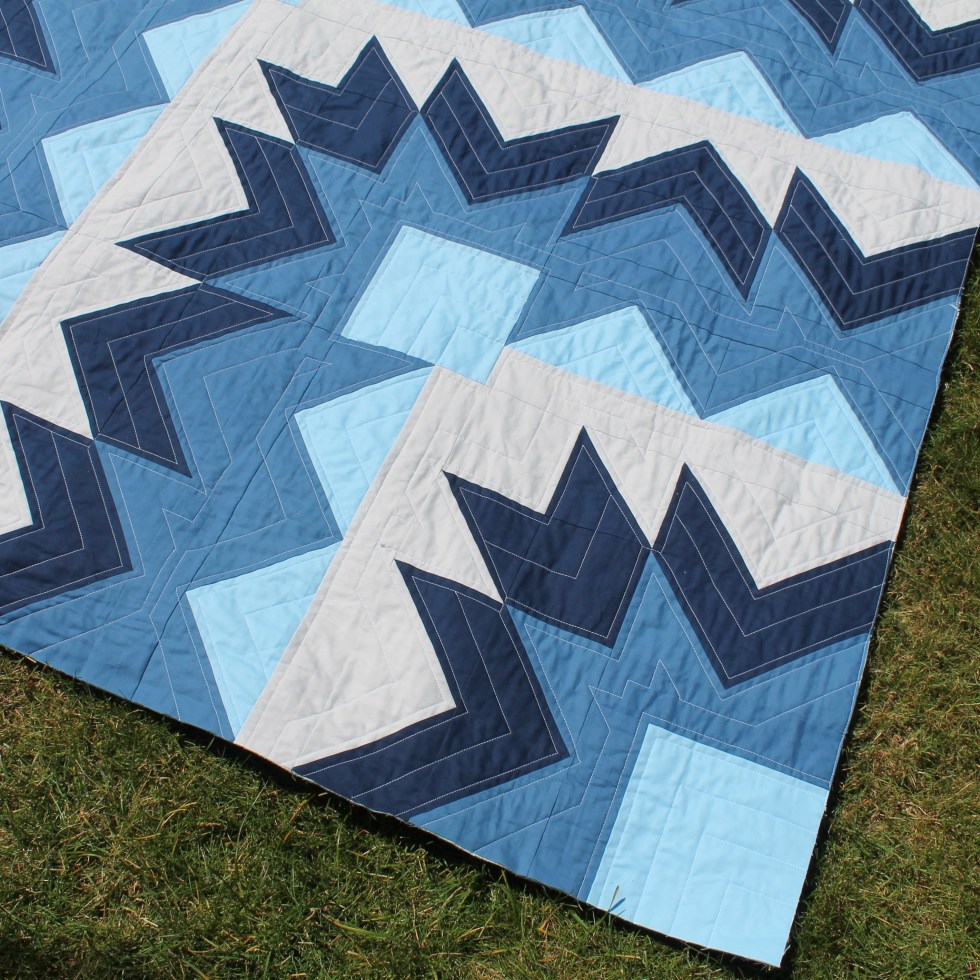
After I drew out this pattern I thought it would be perfect for my Brother. You can make it manly or make it more girly with floral prints. The design reminded me of Ice crystals so that’s where I came up with the name Crystal Wave. I like how the pattern echo’s out and has sharp repeating lines.
This is a 20 inch block quilt, so it goes together super quilt. It’s great for the adventurous beginner to intermediate quilter. This quilt uses my favorite 4 at 1 time no waste flying geese method. So cutting your pieces and sewing a precise 1/4 scant seem is necessary.
I thought Kona Cotton Solids would be great for this quilt. Storm (Dark), Cadet (Medium), Prairie Sky (Light) and Silver (background). It kind of give the quilt an ombre look.
Sometimes a quilt needs a little more than straight line quilting from top to bottom. With this quilt I decided to echo the pattern with 1/4 inch straight line and then about an inch from that. I used my walking foot with it’s guide.
I love how a quilt can look so different in different fabrics. Here are some of the quilts my awesome quilt testers made:
This post may contain affiliate links. I may receive commissions from purchases made through links in this post.
Even though it’s not officially ‘Winter’ yet, it sure feels like it outside! Here in Western Washington we huddle inside by our heaters when it hits low 40’s. But since my son is in school every morning and afternoon we have to walk to the bus stop for school.
I have made myself a few infinity scarves and I love that you don’t have to worry about it falling off. And that’s a big issue with the long scarves I had made for Cloud and Snow. The ends of the scarf end up dragging on the ground and that’s no good!
So I decided I would make them infinity scarves…cowls…neck warmers, what ever you wan to call them!
First you need to find your gage, how many stitches on circular needles make 1 inch. This is key since your gage will be different depending on the yarn you select and the needles you select. You can use the recommending needle size that is listed on your yarn.
Then you find the circumference on your head. I measured around the forehead to the back of the head, the scarf will need to be large enough to slip over your head. You don’t want it too big if you want it to stay up around your ears and nose.
Next: Gage (how many stitches equal 1 inch) x Head circumference = number to cast on.
Your cast on amount should be divisible by 4.
For Cloud’s I used Hometown by Lion Brand Yarn. This is a bulky yarn. I used my circular size 13 needles. My gage was 2 stitches for 1 inch and his head is 21 inches (my kids have large heads).
So 2 x 21= 42 I rounded up to 44.
If you want a tighter fitting scarf round down to 40.
Chunky Neck Warmer This should fit a 5 to 10 year old, depending on head size. Adjust depending on your gage and the circumference of the head (see above to calculate your cast on amount)
What you need:
1 – Hometown Lion’s Brand Yarn (81 yds)
Size 13 Circular needles (20 inch cord or smaller)
Large Tapestry Needle
Cast On 44 stitches
Join to work in the round, making sure not to twist the stitches, place a stitch marker at the first stitch.
Knit 2 Purl 2
Repeat this until you have about 10.5 inches (9.5 inches for a smaller child)
Cast OFF
Weave in your ends
This is Cloud’s scarf on Snow. She wanted some fun photo time too!
Snow is 5 and Cloud is 8 1/2 years old.
This post may contain affiliate links. I may receive commissions from purchases made through links in this post.
Now that we have all our blocks done, it’s time to make them into a quilt!! I like to make the cornerstones with the strip piecing method. This makes it so you don’t have to cut out a ton of little squares. If you would like to assemble your top the way I completed my top, click below to download the directions:
If you are looking for the Flying Geese Supplemental, you can find that in the Block 1 Blog post.
Quilt Sandwich: First you will need to make your Quilt Sandwich. You will need to cut and sew your backing fabric to make it fit under your quilt correctly. Make sure it is at least 3 inches wider than your quilt top on all sides (quilt top size + 6 inches). Trim your selvage edge off after joining your pieces.
Make your quilt sandwich by first laying down your quilt backing, wrong side facing up. Tape down to a hard surface, making fabric taut. Next lay your batting on top. Smooth out with your hands, do not stretch. Then lay your quilt top right side up, smooth out with your hands.
Basting Your Quilt: Spray baste: My favorite way to baste my quilt is by using Spray Baste! It makes basting so much easier. If you have allergies, this is probably not a good option for you.
Find a place where you can lay out your quilt. Make sure to tape the backing fabric taut to the floor (or large table).
Here’s great spray baste tutorial by Cluck Cluck Sew: Spray Baste Tutorial
Pin basting: You can use safety pin about 3 to 4 inches apart (about the width of your hand). I like to use the large curved basting pins. This takes a little longer than the spray basting, but is a great option.
Quilting your Quilt:
This step is totally up to you!
With my quilt I chose to quilt from top to bottom ‘organic’ straight lights approximately 1 inch apart. I used my walking foot with the guide set to 1 inch.
Hand Tie your Quilt: Some prefer to tie there quilt.
Here’s a tutorial on how to do this on Craftsy.
Hand Quilt: Here’s an article that goes over the basics of hand quilting on Craftsy.
Machine Quilt using your Walking Foot:
Emily Dennis from Quilty Love has a great tutorial on how to Zig zag quilt your quilt with a Walking foot. Click here I love this method of quilting, it give your quilt great texture.
Free Motion Quilting:
Free motion quilting can give you great texture and if you aren’t great at quilting straight lines, this would be great for you. Suzy Williams from Suzy Quilts has a great Free Motion Quilting Tutorial. Click here.
Binding Your Quilt:
Binding is the fabric strip that goes on the edge of your quilt. It covers all of the unfinished edges and rounds out your quilt.
You will want to make sure to square up your quilt before you attach the binding. Cut off the extra batting around the edges and make sure your sides are straight and corners are squared.
Most quilters will cut 2 /12 inch by width of fabric strips and then sew them together at the ends at a diagonal. Then press the strip in half, so that you are wrapping 2 layers of fabric around all of your edges.
You can machine sew the binding to the front of your quilt and wrap it around to the back and hand stitch it down. Or some prefer sewing the binding to the back of the quilt, wrapping it around to the front and machine stitching it down.
One of my favorite binding tutorials is by Suzy Williams of Suzy Quilts. Go check it out!
Make sure to post your photo’s on Instagram with the hashtag #CloudyDayQAL or in the Facebook Group: Happy Cloud Creations Quilt Along (If you are just joining, make sure to answer the Questions so I can weed out the spam/fake accounts from the real ones)


")
")


