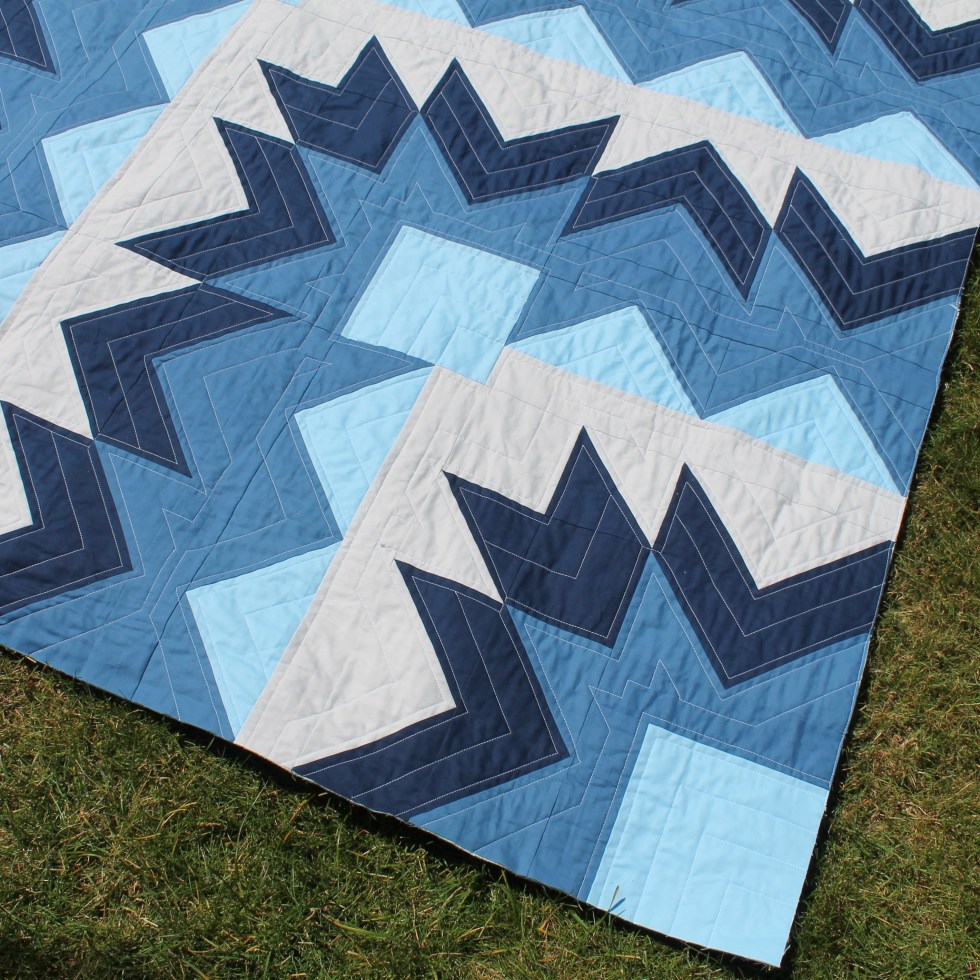
This summer my oldest Nephew graduated high school. I wanted to make him a special quilt that he can keep and snuggle in forever! A lot of my quilt patterns lean toward the girly side, so I wanted to design something that could be masculine. I had been playing around with the idea of making a quilt with lots of flying geese units and some dead space and this designed popped in my head! It reminds me of a flock of ducks flying south for the winter. So I decided to name this quilt Left the Nest because of the flying geese block, but also because the quilt recipient is now moving on to a new chapter in his life. All that hard work in high school has paid off and now he has graduated with an AA. We are all so proud of him!
This quilt is designed to have 3 background fabrics going from light to dark (right to left) and 5 main fabrics going from dark to light (right to left). But you can also make it using 1 background fabric easily but adding all the background pieces together.
When I quilted this one I wanted to add more interest in the empty spaces than just straight lines from the top to the bottom of the quilt. So I mimicked the shapes of the Flying geese block. I love how it turned out!
The quilt is designed so the larger the size quilt you make, the larger the size pieces you will use. Baby, Throw, Twin and Quilt all have the same layout. The King size has a couple added blocks to make the quilt a square shape.
This quilt pattern is great for the adventurous beginner to intermediate quilter.
I’d love to see your versions! On Instagram you can use the hashtag #LeftTheNestQuilt or you can post your photo’s in my Quilt Along Group!
This post may contain Affiliate Links. When using the link, you pay the same amount for the items, I just receive a small commission.
Welcome to Week 8, the LAST week of our Frame It Quilt Along! I have enjoying making this quilt with you all!
You can find the Digital and Paper Pattern (USA and Canada) in my shop 15% OFF thru April 9th!! If you are located outside the USA or Canada you can find the pattern in my Etsy Shop!!
Now that you have all your blocks done, we need to turn those blocks into a quilt!
Things you will need:
Backing Fabric (at least 6 inches wider and longer than your quilt top) Quilt Batting (at least 6 inches wider and longer than your quilt top) Basting Spray or Basting Pins
Binding Fabric These are helpful but not necessary: Hera Marker to mark out your quilting lines
Walking Foot (Helps pull your quilt from both the top and the bottom)
Finishing our Quilts!
Quilt Sandwich: First you will need to make your Quilt Sandwich. You will need to cut and sew your backing fabric to make it fit under your quilt correctly. Make sure it is at least 3 inches wider than your quilt top on all sides (quilt top size + 6 inches). Trim your selvage edge off after joining your pieces.
Make your quilt sandwich by first laying down your quilt backing, wrong side facing up. Tape down to a hard surface, making fabric taut. Next lay your batting on top. Smooth out with your hands, do not stretch. Then lay your quilt top right side up, smooth out with your hands.
Basting Your Quilt:
Spray baste: My favorite way to baste my quilt is by using Spray Baste! It makes basting so much easier. If you have allergies, this is probably not a good option for you.
Find a place where you can lay out your quilt. Make sure to tape the backing fabric taut to the floor (or large table).
Here’s great spray baste tutorial by Cluck Cluck Sew: Spray Baste Tutorial
Pin basting: You can use safety pin about 3 to 4 inches apart (about the width of your hand). I like to use the large curved basting pins. This takes a little longer than the spray basting, but is a great option.
Quilting your Quilt:
This step is totally up to you!
With my quilt I chose to quilt from top to bottom ‘organic’ straight lights approximately 1 inch apart. I used my walking foot with the guide set to 1 inch. I like to use my seams as a guide to help keep my lines straight.
Hand Tie your Quilt: Some prefer to tie there quilt.
Here’s a tutorial on how to do this on BluePrint.
Hand Quilt: Here’s a wonderful video tutorial by Suzy Quilts all about How to Hand Quilt.
Machine Quilt using your Walking Foot:
Emily Dennis from Quilty Love has a great tutorial on how to Zig zag quilt your quilt with a Walking foot. Click here I love this method of quilting, it give your quilt great texture.
Free Motion Quilting:
Free motion quilting can give you great texture and if you aren’t great at quilting straight lines, this would be great for you. Suzy Williams from Suzy Quilts has a great Free Motion Quilting Tutorial. Click here.
Binding Your Quilt:
Binding is the fabric strip that goes on the edge of your quilt. It covers all of the unfinished edges and rounds out your quilt.
You will want to make sure to square up your quilt before you attach the binding. Cut off the extra batting around the edges and make sure your sides are straight and corners are squared.
Most quilters will cut 2 /12 inch by width of fabric strips and then sew them together at the ends at a diagonal. Then press the strip in half, so that you are wrapping 2 layers of fabric around all of your edges.
You can machine sew the binding to the front of your quilt and wrap it around to the back and hand stitch it down. Or some prefer sewing the binding to the back of the quilt, wrapping it around to the front and machine stitching it down.
One of my favorite binding tutorials is by Suzy Williams of Suzy Quilts. Go check it out!
I’m so excited to see everyone finished quilts!
JOIN ME for a LIVE Video tomorrow (April 3, 2019) at 10:15 am PDT (West Coast USA). I will be going over these finishing steps and seeing if anyone has questions! If you can’t join me LIVE, the video will be saved to the Facebook Group, it will be available on Instagram for 24 hours and I will upload it to my YouTube channel.
Join the Quilt Along by posting your progress photo’s on Instagram with the hashtag #FrameItQAL
OR Join the Facebook Quilt Along Group and post your progress photo there!!
I asked in my Quilt Along Group which pattern everyone would like to make next as a quilt along and the majority voted for my Frame It Quilt Pattern. I love the modern look of this pattern!
What you will get: Both versions will come with the Main pattern and 2 supplementals. One supplemental will give you directions how to make the square in square blocks with Half Square Triangles. The second will give you directions how to make the square in square block with the Stitch and Flip method.
The main pattern uses triangles cut on the bias. So I thought I’d give these two other options for those that are worried about sewing triangles.
I found that if you are gentle with your fabric and sew slowly, you shouldn’t have a problem with sewing the triangles on the bias. For extra help you can starch your fabric before cutting.
Quilt Size: Throw – 56 x 74 inches (12 blocks)
I will be making the Throw size, but you can choose which ever size you would like and adjust how many blocks you will finish in weeks 5 – 7. These sizes are also in the pattern: Baby (4 blocks), Twin (20 blocks), Queen (30 blocks) and King (36 blocks)
Quilt Along Schedule:
Feb. 12 – Week 1-2: Get Pattern and pick out fabrics
Feb. 26 – Week 3: Cut our pieces
Mar. 5 – Week 4: Make center units (Square in Square Block) (Step 1 – 4)
Mar. 12 – Week 5: Finish 4 Blocks
Mar. 19 – Week 6: Finish 4 Blocks
Mar. 26 – Week 7: Finish 4 Blocks
Apr. 2 – Week 8: Add sashing and Finish Quilt
Each week I will have a LIVE video to go over that weeks step and answer any questions you have! You will be able to view my LIVE videos in my Facebook Quilt Along Group: Happy Cloud Creations Quilt Alongs OR my Instagram.
After the video is done, I will upload it to my YouTube page for easy access!
Since I have received a lot of requests for the Fabric Requirements early, you can download them now! Make sure to decided which way you would like to make the blocks. The main pattern, half square triangle and stitch and flip versions all have slightly different fabric requirements.
If you like to pre-wash your fabric or if you are worried about miss cutting, but a little extra!
After I drew out this pattern I thought it would be perfect for my Brother. You can make it manly or make it more girly with floral prints. The design reminded me of Ice crystals so that’s where I came up with the name Crystal Wave. I like how the pattern echo’s out and has sharp repeating lines.
This is a 20 inch block quilt, so it goes together super quilt. It’s great for the adventurous beginner to intermediate quilter. This quilt uses my favorite 4 at 1 time no waste flying geese method. So cutting your pieces and sewing a precise 1/4 scant seem is necessary.
I thought Kona Cotton Solids would be great for this quilt. Storm (Dark), Cadet (Medium), Prairie Sky (Light) and Silver (background). It kind of give the quilt an ombre look.
Sometimes a quilt needs a little more than straight line quilting from top to bottom. With this quilt I decided to echo the pattern with 1/4 inch straight line and then about an inch from that. I used my walking foot with it’s guide.
I love how a quilt can look so different in different fabrics. Here are some of the quilts my awesome quilt testers made:
You can also find these downloads in my CRAFTSY SHOP.
Since some of you don’t care for the 4 at 1 time flying geese method, I’ve made a PDF that goes over what size pieces you will need to cut to make your flying geese with the 1 at a time method or by using half square triangles. This week we will be making the 3 1/2 x 6 1/2 inch flying geese.
Tips for making 4 at 1 time flying geese: * Go slow when sewing for accurate seams
*Use an accurate scant 1/4 inch seam * Make sure to read ALL the instructions and look at the diagrams closely * Finger press your seams open before using your iron * Press seams without steam if possible (Dry iron) * When Pressing, press down with out motion. Moving your iron around a lot can distort your flying geese
Join me at 10am PDT (West Coast USA) in the FACEBOOK GROUP or on INSTAGRAM today for a LIVE Video to go over how to make this block. I will go over how to make the flying geese and answer any questions you have.
Cloudy Day Quilt Sampler Quilt Along Schedule: September 19th – Download Fabric Requirements and Blank Coloring Sheet
October 2nd – Block 1
October 9th – Block 2
October 16th – Block 3
October 23rd – Block 4
October 30th – Block 5
November 6th – Block 6
November 13th – Block 7
November 20th – Block 8
November 27th – Block 9
December 4th – Finishing Instructions
Share your progress:
On Instagram use the hashtag: #cloudydayqal On Facebook you can join the quilt along group: JOIN THE GROUP
Happy Quilting!
Andrea
My fabric’s for Block 1! I usually use yardage for my quilts. I have a bunch of Fat Quarters, so I thought try something different and go scrappy!
Welcome to the Cloudy Day Quilt Sampler Quilt Along!! This quilt along will consist of directions for 1 block a week for 9 weeks! Each block will be FREE to download!
This quilt is heavy on the 4 at 1 time no waste flying geese. If you prefer making your flying geese using the 1 at a time method or using 2 half square triangles to make your geese, I would suggest purchasing a little extra fabric. (I will provide a PDF that tells you what pieces you will need to cut to make the Flying Geese with the 1 at a time method or the half square triangle method).
You can use a jelly roll for Color A, all other colors have larger than 2 1/2 inch pieces.
Our Quilt Along Schedule is at the bottom of this blog post.
This quilt would be great using the 4 main colors, or going totally scrappy! I’m so excited to see what fabrics you pic!
On Instagram use the hashtag: #cloudydayqal
On Facebook you can join the quilt along group to share your progress: JOIN THE GROUP
Here are some suggested colorways:
Cloudy Day Quilt Sampler Quilt Along Schedule:
September 19th – Download Fabric Requirements and Blank Coloring Sheet October 2nd – Block 1 October 9th – Block 2 October 16th – Block 3 October 23rd – Block 4
October 30th – Block 5
November 6th – Block 6
November 13th – Block 7
November 20th – Block 8
November 27th – Block 9
December 4th – Finishing Instructions
Share your Fabric Selection: On Instagram use the hashtag: #cloudydayqal On Facebook you can join the quilt along group: JOIN THE GROUP
My favorite part of Spring and Summer time is when all the flowers start to bloom! Since we can’t have blooming flower’s year round, it’s fun to make a quilt with flower blooms!
I had a stack of this Cotton and Steel fabric, I had been trying to decide what quilt pattern to make with it. So that’s when you draw up a new pattern. It’s my go to color combo: Navy, Pink, Purple and Teal.
A lot of my pattern’s are an overall design, so I wanted to try to create something with a repetitive design or repetitive block. That is where the Bloomtastic quilt was born.
It’s made up of a bunch of Flying Geese, Squares, Rectangles and a few half square triangles. My pattern uses the 4 at 1 time Flying Geese method. It’s my favorite method, you can make a lot of Flying Geese so quickly.
Once all the Flying geese and Half square triangles are made, the quilt goes together pretty quickly. I decided quilt my original quilt with straight lines from top to bottom, about 1 inch apart. This is a quick and easy way to quilt, and it give the quilt great texture.
I love how this quilt turned out so much! I decided to gift this one to my sister.
After finding this gorgeous Laural Canyon Floral fabric, I had to make a baby size Bloomtastic quilt.
The top is made with Penned Pal dots by Robert Kaufman for the background fabric and the blooms are made using Kona Cotton in Bright Pink, Bahama Blue, Lagoon and Bubble Gum and Canary yellow.
This baby Bloomtastic quilt is now in my shop for sale! Click here!
Welcome to Week 10 of the Happy Flower Garden Quilt Along! This week we will be finishing our quilts!! We will go over Basting, Quilting and Binding our quilts. (Download the Pattern)
Quilt Sandwich: First you will need to make your Quilt Sandwich. You will need to cut and sew your backing fabric to make it fit under your quilt correctly. Make sure it is at least 3 inches wider than your quilt top on all sides (quilt top size + 6 inches). Trim your selvage edge off after joining your pieces.
Make your quilt sandwich by first laying down your quilt backing, wrong side facing up. Tape down to a hard surface, making fabric taut. Next lay your batting on top. Smooth out with your hands, do not stretch. Then lay your quilt top right side up, smooth out with your hands.
Basting Your Quilt: Spray baste: My favorite way to baste my quilt is by using Spray Baste! It makes basting so much easier. If you have allergies, this is probably not a good option for you.
Find a place where you can lay out your quilt. Make sure to tape the backing fabric taut to the floor (or large table).
Here’s great spray baste tutorial by Cluck Cluck Sew: Spray Baste Tutorial
Pin basting: You can use safety pin about 3 to 4 inches apart (about the width of your hand). I like to use the large curved basting pins. This takes a little longer than the spray basting, but is a great option.
Quilting your Quilt:
This step is totally up to you!
With my Small Block Baby size quilt I chose to quilt from top to bottom ‘organic’ straight lights approximately 1 inch apart. I lined my walking foot so the needle was about 1/2 inch from each seam.
Hand Tie your Quilt: Some prefer to tie there quilt.
Here’s a tutorial on how to do this on Craftsy.
Hand Quilt: Here’s an article that goes over the basics of hand quilting on Craftsy.
Machine Quilt using your Walking Foot:
Emily Dennis from Quilty Love has a great tutorial on how to Zig zag quilt your quilt with a Walking foot. Click here I love this method of quilting, it give your quilt great texture.
Free Motion Quilting:
Free motion quilting can give you great texture and if you aren’t great at quilting straight lines, this would be great for you. Suzy Williams from Suzy Quilts has a great Free Motion Quilting Tutorial. Click here.
Binding Your Quilt:
Binding is the fabric strip that goes on the edge of your quilt. It covers all of the unfinished edges and rounds out your quilt.
You will want to make sure to square up your quilt before you attach the binding. Cut off the extra batting around the edges and make sure your sides are straight and corners are squared.
Most quilters will cut 2 /12 inch by width of fabric strips and then sew them together at the ends at a diagonal. Then press the strip in half, so that you are wrapping 2 layers of fabric around all of your edges.
You can machine sew the binding to the front of your quilt and wrap it around to the back and hand stitch it down. Or some prefer sewing the binding to the back of the quilt, wrapping it around to the front and machine stitching it down.
One of my favorite binding tutorials is by Suzy Williams of Suzy Quilts. Go check it out!
I’m so excited to see everyone’s finished quilts!! Make sure to use the hashtag #happyflowergardenqal on Instagram or post your photo’s in the Facebook Group!!
I will be filming a LIVE Video Today, Tuesday July 3rd at 10:15 am PDT (West Coast USA) in the Facebook Group! I will be going over how to put you quilt top together and answering any questions you have. The video will be saved for later viewing.
Welcome to Week 9 of the Happy Flower Garden Quilt Along! This week we will be finishing our quilt tops! Yay!
If you are sticking to the pattern, we will be adding sashing and corner stones in between all of our blocks. You could go with sashing the same color as your background fabric, or something totally different!! It all depends on how you want your quilt to look.
I like using cornerstones, it helps you line up your blocks and gives your quilt another design element.
With my original Happy Flower Garden quilt I used the background fabric for my sashing.
The second Happy Flower Garden Quilt I made, I used a beautiful floral for my sashing!
You could leave out the cornerstones and make long sashing strips. I’m excited to see what you all chose to do!!
I will be filming a LIVE Video Today, Tuesday June 26th at 10:15 am PDT (West Coast USA) in the Facebook Group! I will be going over how to put you quilt top together and answering any questions you have. The video will be saved for later viewing.
Welcome to Week 8 of the Happy Flower Garden Quilt Along! This week we will be making our Star Flower Blocks! Yay! These are our last blocks for our quilt.
I’ve always loved the look of Star blocks! They are so pretty and you can change up the centers with different blocks. This block will incorporate all the colors we used in the Tulip and Corner Tulip blocks.
I am loving seeing all of your finished blocks in the Facebook group and on Instagram! Make sure to share your progress photo’s on Instagram with the hashtag #HappyFlowerGardenQA Or Post your photo’s in the Facebook Group!!
I will be filming a LIVE Video Today, Tuesday June 19th at 10:15 am PDT (West Coast USA) in the Facebook Group! I will be going over how to make this Star Flower block and answering any questions you have. The video will be saved for later viewing.