Posted on 10 Comments

Happy Flower Garden Quilt Along!

IMG_4344 (3)

My Happy Flower Garden Quilt is one of my favorite quilts. It may be because this is the quilt I snuggle with on my couch. I love flowers and this is a great way to be around flowers year round.

I had posted a survey in my Quilt Along Facebook Group. Several people expressed interest in using this pattern for a Quilt Along! I think it will be a great quilt a long pattern, since it’s kind of a sampler quilt and it’s perfect for spring!

Join the Facebook Group for an extra Coupon Code!!

The Fabric Requirements are listed inside the pattern. 

Download today!

You can sign up for my weekly Newsletter that will give you the new weeks task and it will direct you to the new blog post!

Sign up for the Newsletter!

The original pattern only included a baby and throw quilt directions. I have recently updated my pattern to also include a queen and king size version.

I had ask my quilter followers if they prefer big block or more blocks of a smaller size. The answer was pretty 50/50. So when you purchase the pattern you will receive 2 pdfs. One is for a small block version and one is for a large block version. Here are the different layouts.

layouts

Most of the Flying geese in this pattern are made using the 4 at 1 time no waste method. With my last quilt along I noticed some of the participants were having trouble using this method. So I made  a supplemental pdf that will give you cutting instructions so you can make all the flying geese using the 1 at a time method or half square triangle method. If you decide to use these alternative methods, I would recommend purchasing a little extra fabric just in case. The fabric requirements are for the piecing in the original pattern. These cutting instructions only replace the pieces used to make the flying geese. So you will need to make sure to omit cutting the piecing from the original pattern.

I asked in the quilt along group when the best start date for the quilt along would be and the final winning date was May 1st! So from now until May 1st, you can download your pattern and pick out your fabrics! Post pictures in the Facebook Group or on Instagram with the hashtag #happyflowergardenQAL

So here’s the quilt along schedule:

May 1st – Week 1 – Cut your Fabric
May 8th – Week 2 – Make your Half Square Triangles
May 15th – Week 3 – Make your Flying Geese units
May 22nd – Week 4 – Make your Bottom Rectangle Blocks
May 29th – Week 5 – Make half of your Tulip Blocks
June 5th  – Week 6 – Make the other half of your Tulip Blocks
June 12th – Week 7 – Make your Corner Tulip Blocks
June 19th – Week 8 – Make your Star Flower Blocks
June 26th  – Week 9 – Add Sashing and Cornerstones (Finish Star Flower Blocks if needed)
July 3rd – Week 10 – Baste, Quilt and Bind

I am so happy to be quilting along with you! I’m so excited to see your fabric picks!! Make sure to share your progress photo’s on Instagram with the hashtag #HappyFlowerGardenQAL

You can also join the Facebook Group and post your photo’s there! Join me in the Facebook Group today at 10:15 am PDT (West Coast USA) for a Live Video to go over the quilt along and fabric selection!

Facebook Group

Download your pattern now and start searching for fabric!!

Download Now!

Happy Quilting!

Posted on 2 Comments

Aloha Ripple QAL Week 9: Finishing Our Quilts!

Wow! It’s already the last week of our Aloha Ripple Quilt Along! It has gone by so fast. Last week we put our quilt tops together, this week we will Baste, Quilt and Bind our quilts.

basting


Basting Your Quilt: 
Spray baste: My favorite way to baste my quilt is by using Spray Baste! It makes basting so much easier. If you have allergies, this is probably not a good option for you.
Find a place where you can lay out your quilt. Make sure to tape the backing fabric taut to the floor (or large table).
Here’s  great spray baste tutorial by Cluck Cluck Sew: Spray Baste Tutorial

Pin basting: You can use safety pin about 3 to 4 inches apart (about the width of your hand). I like to use the large curved basting pins. This takes a little longer than the spray basting, but is a great option.

quilting

Quilting your Quilt:
This step is totally up to you! I like to straight line quilt my quilt with my walking foot on my domestic machine. With my floral Aloha Ripple Quilt I quilted from the center out following the seams, so there was only about a 1/4 of the quilt in my sewing machine throat at a time.

Hand Tie your Quilt: Some prefer to tie there quilt.
Here’s a tutorial on how to do this on Craftsy.

Machine Quilt using your Walking Foot: 
Emily Dennis from Quilty Love has a great tutorial on how to Zig zag quilt your quilt with a Walking foot. Click here I love this method of quilting, it give your quilt great texture.

Free Motion Quilting:
Free motion quilting can give you great texture and if you aren’t great at quilting straight lines, this would be great for you. Suzy Williams from Suzy Quilts has a great Free Motion Quilting Tutorial. Click here.

rainbow aloha (2)

Binding Your Quilt: Binding is the fabric strip that goes on the edge of your quilt. It covers all of the unfinished edges and rounds out your quilt.

You will want to make sure to square up your quilt before you attach the binding. Cut off the extra batting around the edges and make sure your sides are straight.

One of my favorite binding tutorials is by Suzy Williams of Suzy Quilts. Go check it out!

IMG_5446 (2)
Since I was using stash fabrics for my Baby size Aloha Ripple Quilt, I decided to go with a scrappy binding. I didn’t have enough of one color, so I used all the colors!

Join me LIVE!! If you have any questions, make sure to join me for my LIVE VIDEO. Today (Tuesday March 13th) at 10:15 am PST (West Coast USA) I will be filming a LIVE video in the Facebook Group to go over tips and answer any questions.

Make sure to share a photo of this weeks step on social media with the hashtag #AlohaRippleQAL or join the Facebook Group and post your photos!!
You can follow me on Instagram here: Instagram.com/HappyCloudCreations

Join the Facebook Group

If you haven’t downloaded the FREE Aloha Ripple Quilt Pattern yet, you can download it here:

Aloha Ripple Quilt Pattern

King Size Aloha Ripple Quilt – Supplement Updated

You can check out the previous week’s blog posts by click the links below.


Starting January 2nd: Download Pattern – Select your fabric and post a photo!
Week 1: January 16th: Cut fabric
Week 2: January 23rd: Make the Flying Geese
Week 3: January 30th: Make the Half Square Triangles
Week 4: February 6th: Make the Center Block (1)
Week 5: February 13th: Make Corner Blocks A (2)
Week 6: February 20th: Make Corner Blocks B (2)
Week 7: February 27th: Make the Stacked Flying Geese blocks (4)
Week 8: March 6th: Assemble your Quilt Top
Week 9: March 13th: Baste, Quilt and Bind your Quilt!

Happy Quilting!
Andrea


Posted on 3 Comments

Aloha Ripple QAL – Week 8: Assembling the Quilt Top

aloha ripple (2)

You guys! All our blocks are done and it’s time to assemble our Quilt Tops! Yay! Cloud is even excited about it!! (See above, he loves to help!) If you are just finding this quilt along now, you can get the free pattern here!

If you had consistent seams and you pieces were cut accurately, everything will line up correctly.

Make sure to lay out your blocks in the correct order.

FOR BLOG

You will then match up (nest) the seams with the block next to each other. This is why we pressed our seams in specific ways. Now they will match up and interlock nicely.
I like to pin a lot! Pin next to each interlocking seam and then in between.

28577011_1735666749830287_3043833173667479552_o

I like to work in rows. Sew the top three blocks together, the middle three blocks together and the bottom three blocks together so they form 3 rows.  Then you nest your seams in the three rows, pin in place and sew them together! Wah Lah! I love how fast this quilt goes together.

aloha ripple (3)

Join me LIVE!! If you have any questions, make sure to join me for my LIVE VIDEO. Today (Tuesday March 6th) at 10:15 am PST (West Coast USA) I will be filming a LIVE video in the Facebook Group to go over tips and answer any questions.

Make sure to share a photo of this weeks step on social media with the hashtag #AlohaRippleQAL or join the Facebook Group and post your photos!!
You can follow me on Instagram here: Instagram.com/HappyCloudCreations

Join the Facebook Group

Next week we will be finishing our quilt up! Get ready for Basting, Quilting and Binding!!

Here is the full Quilt Along Schedule:

Starting January 2nd: Download Pattern – Select your fabric and post a photo!
Week 1: January 16th: Cut fabric
Week 2: January 23rd: Make the Flying Geese
Week 3: January 30th: Make the Half Square Triangles
Week 4: February 6th: Make the Center Block (1)
Week 5: February 13th: Make Corner Blocks A (2)
Week 6: February 20th: Make Corner Blocks B (2)
Week 7: February 27th: Make the Stacked Flying Geese blocks (4)
Week 8: March 6th: Assemble your Quilt Top
Week 9: March 13th: Baste, Quilt and Bind your Quilt!

Happy Quilting!
Andrea

Posted on 2 Comments

Aloha Ripple QAL – Week 7: Stacked Flying Geese Blocks

IMG_5434 (2)

Welcome to Week 7 of the Aloha Ripple Quilt Along!! This week we will be making our last blocks! Can you believe it! This quilt along is going so fast!

We will be making 4 Stacked Flying Geese blocks. 2 of them will have 5 flying geese in them and 2 of them will have 6 flying geese in them.

Making your Stacked Flying Geese block:

First I like to layout all my flying geese in the correct order. Then I like to sew two flying geese together at a time, until you sew the whole row together. Make sure to press your flying geese block according to the arrows on the pattern! This will ensure that your seams nest when you go to sew all your blocks together next week.

2 of these blocks will have an additional flying geese sewn to the top! These blocks will go together super quickly!

IMG_5434 (2)

If you have any questions, make sure to join me for my LIVE VIDEO. Tomorrow (Wednesday Feb. 21st) at 10:15 am PST (West Coast USA) I will be filming a LIVE video in the Facebook Group to go over tips and answer any questions.

Make sure to share a photo of this weeks step on social media with the hashtag #AlohaRippleQAL or join the Facebook Group and post a photo of  your stacked Flying Geese blocks!
You can follow me on Instagram here: Instagram.com/HappyCloudCreations

Join the Facebook Group

If you haven’t downloaded the FREE Aloha Ripple Quilt Pattern yet, you can find it in my Craftsy shop!

Download Pattern

Next week we will be put all our blocks together to make our quilt top! Yay!!!

Here is the full Quilt Along Schedule:

Starting January 2nd: Download Pattern – Select your fabric and post a photo!
Week 1: January 16th: Cut fabric
Week 2: January 23rd: Make the Flying Geese
Week 3: January 30th: Make the Half Square Triangles
Week 4: February 6th: Make the Center Block (1)
Week 5: February 13th: Make Corner Blocks A (2)
Week 6: February 20th: Make Corner Blocks B (2)
Week 7: February 27th: Make the Stacked Flying Geese blocks (4)
Week 8: March 6th: Assemble your Quilt Top
Week 9: March 13th: Baste, Quilt and Bind your Quilt!

Happy Quilting!
Andrea

Posted on 4 Comments

Aloha Ripple QAL – Week 5: Corner Block A

IMG_5420 (2)

Welcome to Week 5 of the Aloha Ripple Quilt Along!! We will be making our Corner Block A!

Now that all our pieces are ready, the next few weeks will go by so quickly. You will need to make 2 of the Corner Block A. They look similar to Corner Block B, but they are different. So you can NOT make 4 of Corner Block A and call it good.

I like to lay out all of my pieces next to my machine. Then I chain piece them together, starting with two squares from the first row, then two squares from the second and so on. Once I get to the last row, I start a adding one square from the first row, then second and so on. (Watch my LIVE Video in the Facebook Group today for further explanation). I keep doing this until all my rows are complete.

Once you have all your rows done, you will want to press your seams in alternating direction from the neighboring row (See pattern for pressing arrows, so that this block connects to your Flying Geese blocks correctly).

Then you will nest your seams together (butt them up against each other so they interlock). Pin them in place and sew! I like to keep my pins in when sewing even though it is a no no. It helps my pieces stay in the correct spot and helps your points line up correctly. Make sure to sew slowly over the intersecting seams.

Yay your block is done! Now wasn’t that easy!

Things to keep in mind:
*Read ALL of the pattern directions
*Make sure ALL of your Half Square Triangles are trimmed to the correct size
*Make sure you are sewing a correct Scant 1/4 inch seam. (See the basic directions in the pattern).
*Don’t stress out if it is not completely perfect! As you can see mine below is not completely perfect. Once it is all quilted, washed and dried, it will be all crinkled and you won’t notice tiny imperfections.

IMG_5420 (2)

LIVE VIDEO: Join me today (Tuesday Feb. 13th) at 10:15 am PST (West Coast USA) for a LIVE video in the Facebook Group to go over tips and answer any questions.

Make sure to share a photo of this weeks step on social media with the hashtag #AlohaRippleQAL or join the Facebook Group and post a photo of  your Corner Block A!
You can follow me on Instagram here: Instagram.com/HappyCloudCreations

Join the Facebook Group

If you haven’t downloaded the FREE Aloha Ripple Quilt Pattern yet, you can find it in my Craftsy shop!

Download Pattern

Next week we will make our Corner Block B!

Here is the full Quilt Along Schedule:

Starting January 2nd: Download Pattern – Select your fabric and post a photo!
Week 1: January 16th: Cut fabric
Week 2: January 23rd: Make the Flying Geese
Week 3: January 30th: Make the Half Square Triangles
Week 4: February 6th: Make the Center Block (1)
Week 5: February 13th: Make Corner Blocks A (2)
Week 6: February 20th: Make Corner Blocks B (2)
Week 7: February 27th: Make the Stacked Flying Geese blocks (4)
Week 8: March 6th: Assemble your Quilt Top
Week 9: March 13th: Baste, Quilt and Bind your Quilt!

Happy Quilting!
Andrea

Posted on 5 Comments

Aloha Ripple QAL – Week 4: Center Block

IMG_5410

Welcome to the 4th week of our Aloha Ripple Quilt Along! I hope you are having a lot of fun sewing along. Now that all of our components are done, it’s time to start making our blocks!! This is my favorite part of quilting. Putting all the pieces together like a puzzle.

This week we will be making the center block of our quilt. The center block is a square in square quilt block. This block goes together super quickly so you will have plenty of time to finish up trimming the half square triangles from last week. This will also give all of you that just joined time to catch up!

Making the Center Block

Please refer to the pattern to find your exact piece sizes. I like to use the stitch and flip method for this block. When making the block this way you don’t have to worry about using triangles cut on the bias.

First you will lay two small squares on top of your large square on opposite corners (with right sides of fabric facing each other).
Mark a line diagonal from one corner to the other on each small square. Stitch right next to the drawn line toward the outer side. Trim off your corner, leaving a 1/4 inch from the seam. Press toward the attached triangles.

Next you will place the other two small squares on the opposite corners. Mark a line diagonal from one corner to the other on each square. Stitch right next to the drawn line. Trim off your corner, leaving a 1/4 inch from the seam. Press toward the attached triangles.

This block is a great way to frame a pretty floral or to fussy cut a cute image. I can’t wait to see all of your blocks!!

LIVE VIDEO: Join me today (Tuesday Feb. 6th) at 10:15 am PST (West Coast USA) for a LIVE video in the Facebook Group to go over tips and answer any questions.

Make sure to share a photo of this weeks step on social media with the hashtag #AlohaRippleQAL or join the Facebook Group and post a photo of  your center block!
You can follow me on Instagram here: Instagram.com/HappyCloudCreations

Join the Facebook Group

If you haven’t downloaded the FREE Aloha Ripple Quilt Pattern yet, you can find it here:

Download Pattern

Next week we will make our Corner Block A!

Here is the full Quilt Along Schedule:

Starting January 2nd: Download Pattern – Select your fabric and post a photo!
Week 1: January 16th: Cut fabric
Week 2: January 23rd: Make the Flying Geese
Week 3: January 30th: Make the Half Square Triangles
Week 4: February 6th: Make the Center Block (1)
Week 5: February 13th: Make Corner Blocks A (2)
Week 6: February 20th: Make Corner Blocks B (2)
Week 7: February 27th: Make the Stacked Flying Geese blocks (4)
Week 8: March 6th: Assemble your Quilt Top
Week 9: March 13th: Baste, Quilt and Bind your Quilt!

Happy Quilting!
Andrea


Posted on 6 Comments

Aloha Ripple QAL – Week 3: Half Square Triangles!

IMG_5401

Welcome to week 3 of our Aloha Ripple Quilt Along!!  This week we will be making lots and lots of half square triangles. (Download Pattern)

I love how versatile half square triangles are! You can make so many pretty designs using this basic block.

I like to make my Half Square Triangles with the 2 at 1 time method. If you have a different method you prefer, go for it! I like this method because all your finished edges will be straight grain and not on the bias.

To make the HST 2 at a time, I add 1 1/4 inch to the finished size HST. So our finished throw size HST will be 5 inches finished, so 5 + 1 1/4= 6 1/4 inches.
I like to give you plenty of wiggle room for when you are trimming your HST down to the correct size.

All of the 6 1/4 inch Main color squares will match up with 1 Background color square of the same size. (See the Aloha Ripple Quilt Pattern for amounts).

With right sides of fabric facing each other, lay one square on top of the other. Draw a line from one corner to the other diagonally. You will then sew a scant 1/4 from the seam on both sides. (Since this size square gives you plenty of wiggle room a regular 1/4 seam would work, I have you sewing a scant 1/4 inch seam, so the whole pattern is consistent.)
Cut down the center, Set your seams with your iron, finger press them open and then press open. SEE BELOW.
IMPORTANT – You will need to then trim down all of your half square triangles to the correct size. The throw size will be 5 1/2 inches. You will want to make sure to line your center seam up with the 45 degree angle on your ruler to insure that your points line up when sewing.

Since trimming the half square triangles can take a long time, next week we will have a super quick and easy block! You can start trimming the HST’s this week and finish trimming the remaining ones next week.

LIVE VIDEO: Join me today (Tuesday Jan 30th) at 10:15 am PST (West Coast USA) for a LIVE video in the Facebook Group to go over tips and answer any questions.

Make sure to share a photo of this weeks step on social media with the hashtag #AlohaRippleQAL or join the Facebook Group and post a photo of all your half square triangles!

Join the Facebook Group

Download Pattern

Next week we will make our first block, the Center Block!

Here is the full Quilt Along Schedule:

Starting January 2nd: Download Pattern – Select your fabric and post a photo!
Week 1: January 16th: Cut fabric
Week 2: January 23rd: Make the Flying Geese
Week 3: January 30th: Make the Half Square Triangles
Week 4: February 6th: Make the Center Block (1)
Week 5: February 13th: Make Corner Blocks A (2)
Week 6: February 20th: Make Corner Blocks B (2)
Week 7: February 27th: Make the Stacked Flying Geese blocks (4)
Week 8: March 6th: Assemble your Quilt Top
Week 9: March 13th: Baste, Quilt and Bind your Quilt!

Happy Quilting!
Andrea

Posted on 10 Comments

Aloha Ripple QAL – Week 2: Flying Geese

IMG_5389 (2)

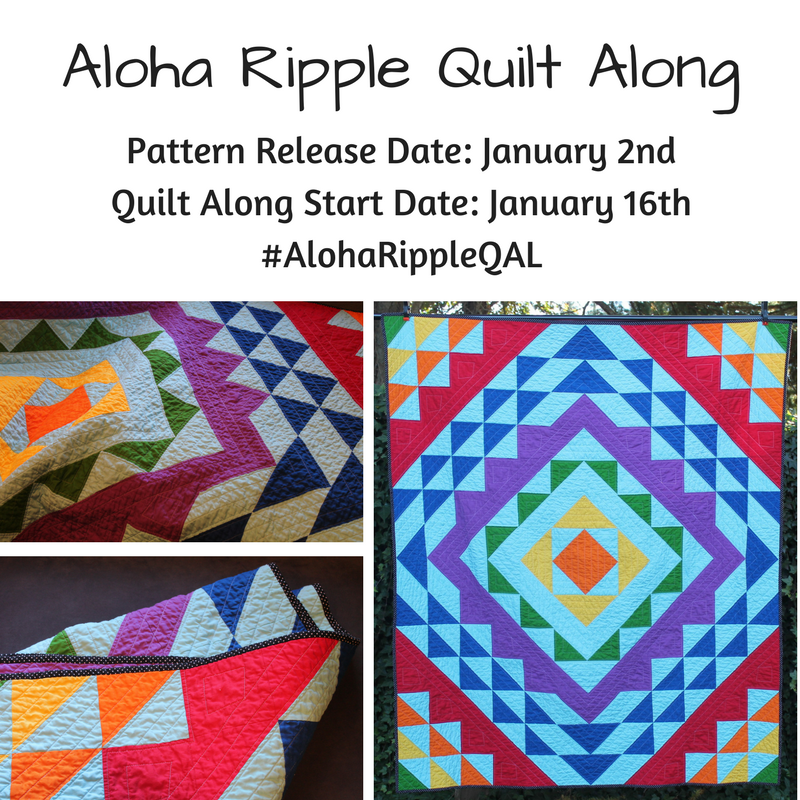
Week 2 of the Aloha Ripple Quilt Along! (Download Pattern)

Now that we have all our pieces cut, it’s time to start making our units! This week we will be making Flying Geese units.

When I started out quilting, I was very nervous about make the Flying Geese unit, so I would opt to use two half square triangles and sew them together instead.
The benefit to using a Flying Geese, is that you don’t have a seam down the middle of your pretty fabric! Less seams equals less sewing! Each time you make them they get easier and easier.

For the Aloha Ripple Quilt we will be using both the 4 at 1 time No Waste Method and the 1 at a time method. See pattern for full directions.

Tips for flying geese:
Go slow when sewing for accurate seams.
Finger press your seams open before using your iron.
Press seams without steam if possible (Dry iron)

Flying Geese – 4 at 1 time No Waste Method

When you are making the Flying Geese with the 4 at 1 time no waste method, you will need 1 large Square and 4 little squares.

Large Square = the width of your finished geese + 1 1/4 inch
Small Squares = the height of your finished geese + 7/8 inch

So for example in this pattern the throw size quilt will have a Finished size geese that is 5 x 10 inches (unfinished 5 1/2 x 10 1/2 inches)
So we will need:
1 Large Square: 10 + 1 1/4 = 11 1/4 inch
4 Small Squares: 5 + 7/8 = 5 7/8 inch

Take your large square and 2 small squares.
With right sides of fabric facing each other, l
ay the two small squares on opposite corners.
Draw a line from one corner to the other diagonally. Pin in place.
Sew a scant 1/4 inch from the drawn line on both sides. A scant 1/4 inch seam is a 1/4 inch that includes the width of your needle/thread. Some 1/4 inch feet will give you this.
Cut down the center line. Press seam to the attached triangles. 

Lay 1 small square down on the corner, right sides of fabric facing each other.
Draw a line from one corner to the other diagonally.
Sew a scant 1/4 inch from your drawn line. Cut down the center and press toward the small triangles. I find these flying geese to be pretty accurate and only need a tiny bit of trimming.

Flying Geese – 1 at a Time Method

Take your (5 1/2 x 10 1/2 inch for throw) rectangle, lay 1 (5 1/2 x 5 1/2 inch) square on top with right sides of fabric together.

Draw a diagonal line from one corner to the other. Stitch one thread width to the outside of the drawn line. You will want to butt your needle up to the outside of your drawn line when you are sewing (see the red line in the diagram). Cut 1/4 inch from your sewn line as shown below. Press toward the attached triangle.
You will attach the second small square to the other side with the same method. Press to the attached triangle. Trim if needed.

oneflyinggeese

I hope you get the hang of making these flying geese units! They are a lot of fun to make and the design possibilities are endless!

Join me today (Tuesday Jan 23 rd) at 10:15 am PST (West Coast USA) for a LIVE video in the Facebook Group to go over tips and answer any questions.

Make sure to share a photo of this weeks step on social media with the hashtag #AlohaRippleQAL or join the Facebook Group and post a photo of all your flying geese!

Join the Facebook Group

Next week we will be making our Half Square Triangles!

Here is the full Quilt Along Schedule:

Starting January 2nd: Download Pattern – Select your fabric and post a photo!
Week 1: January 16th: Cut fabric
Week 2: January 23rd: Make the Flying Geese
Week 3: January 30th: Make the Half Square Triangles
Week 4: February 6th: Make the Center Block (1)
Week 5: February 13th: Make Corner Blocks A (2)
Week 6: February 20th: Make Corner Blocks B (2)
Week 7: February 27th: Make the Stacked Flying Geese blocks (4)
Week 8: March 6th: Assemble your Quilt Top
Week 9: March 13th: Baste, Quilt and Bind your Quilt!

Happy Quilting!
Andrea

Posted on 12 Comments

Aloha Ripple Quilt Along

IMG_5047 (2)

Welcome to the Aloha Ripple Quilt Along!!

I’ve noticed most quilt alongs quilts consist of either sampler blocks or a bunch of the block. So I thought it would be fun to do something different! The Aloha Ripple quilt has a modern over all design, but it is still made with distinct blocks. The blocks are made up of squares, half square triangle and flying geese blocks. Each week we will have a new step of quilt. I will be posting a new blog post each week to go over that weeks step. I will also be filming a live video each week to go over the step and answer any questions in the Facebook Group.

This quilt is perfect for the adventurous beginner to intermediate quilter. It would look great in a variety of fabrics. I would recommend picking a contrasting fabric for the background, so the design pops. The pattern comes with directions for a Baby, Throw and Queen size quilt, so you can decide which size is perfect for you.

CLICK HERE TO DOWNLOAD Aloha Ripple Quilt Pattern

CLICK HERE TO DOWNLOAD King Size Aloha Ripple Quilt – Supplement Updated

Here is the Quilt along Schedule!

Starting January 2nd: Download Pattern – Select your fabric and post a photo!
Week 1: January 16th: Cut fabric
Week 2: January 23rd: Make the Flying Geese
Week 3: January 30th: Make the Half Square Triangles
Week 4: February 6th: Make the Center Block (1)
Week 5: February 13th: Make Corner Blocks A (2)
Week 6: February 20th: Make Corner Blocks B (2)
Week 7: February 27th: Make the Stacked Flying Geese blocks (4)
Week 8: March 6th: Assemble your Quilt Top
Week 9: March 13th: Baste, Quilt and Bind your Quilt!

I’m so excited to see all of your progress during this quilt along! Make sure to post your photo on social media with the hash tag #AlohaRippleQAL or post your photos in the Facebook Group!  CLICK HERE

My original Aloha Ripple Quilt was made for my parents-in-law for their anniversary. I thought they would like a bright and cheerful quilt. They both love visiting Hawaii and the quilt was made with Kona Cotton. So I decided to name the quilt Aloha Ripple!
I quilted the quilt in a straight line fashion mimicking the design. I bound it in a fun black and white dot fabric and backed it with the beautiful purple I used on the front.

Fabrics use in mine: Red, Orange, Canary, Grasshopper, Bahama Blue, Royal, Magenta and Pimatex Basics Pin Dot all by Robert Kaufman

My second Aloha Ripple quilt was a baby size quilt! I wanted to use up some of my stash so I found a bunch of solids that went great together!

If you couldn’t tell, I love Kona Cottons! These are: Grape mist, Aloe, Purrisan, Gumdrop, Ultra Marine, Noble Purple and Medium Grey

I found this awesome fabric from the Black and White Collection by Jennifer Sampou for Robert Kaufman Fabrics. I didn’t have enough of one fabric for the binding, so I decided to use them all!

I’m looking forward to seeing all of your fabric choices and the beautiful quilts you make!

Post your photo on social media with the hash tag #AlohaRippleQAL or post your photos in the Facebook Group!  CLICK HERE

Happy Quilting!
Andrea

Aloha Ripple Quilt Along insta

Posted on Leave a comment

Pointed Quilt

IMG_4976 (3)Yay! My Pointed Quilt is done! I’ve been seeing a lot of quilts turned on-point and I thought it would be awesome to try to make one myself.

Paper Pattern
Digital Download (USA)
Digital Download (International)

I was trying to design a block that was Fat Quarter friendly. This block is similar to my block 7 of the Snowy Day Quilt Sampler. The block in my Pointed quilt is a little smaller and turned on-point!

Since this block uses different size pieces through out, you must make sure to use an accurate scant 1/4 inch seam. This will ensure that all of your pieces line up correctly.

You can make sure you are using a scant 1/4 inch seam by taking 3 –  2 1/2 x 4 inch strips. Sew them all together lengthwise. The center strip will measure 2 inches wide finished, if you are using a scant 1/4 inch seam.

scant fourth inch

I have been trying to decide on a pattern to use this beautiful Garden Secrets fabric by Sarah Watson for Cloud9 Fabrics. After I drew up my pattern I thought this fabric line would be perfect.

The math for a on-point quilt is a little different than a regular quilt. Once I got my mind wrapped around the idea. It was go time! The quilt goes together pretty quickly.

pointed quilt andrea 2

Once my quilt was all finished I decided to go with a beautiful purple backing fabric. This fabric is Kona Cotton in Gumdrop by Robert Kaufman. I like to use my Kona Color chart to pick out the perfect shade of fabric.

I also found the perfect shade of Cotton Gutterman thread that matches the Ice Frappe Background fabric.

pointed quilt andrea

I decided to quilt this to mimic the points. I usually opt for a straight line quilting, which is much faster. This one took more time, but was totally worth it. I love how it turned out!

IMG_4980 (3)

In an effort to use up my stash, I decided to go with a scrappy binding! I used two fat quarters of the dash print and some scraps of a couple of the other light colored fabrics.20171007_154017

You can download the pattern today!!

PAPER PATTERN

Make sure to use the hashtag #pointedquilt

Happy Quilting!
Andrea

Here are some made by my awesome testers!!

marg sharpe for listingBrittany listing

Cindy (2) listingcindy price kelley (2) listingRoseMassey (2) listingVickie Riches (2) listing