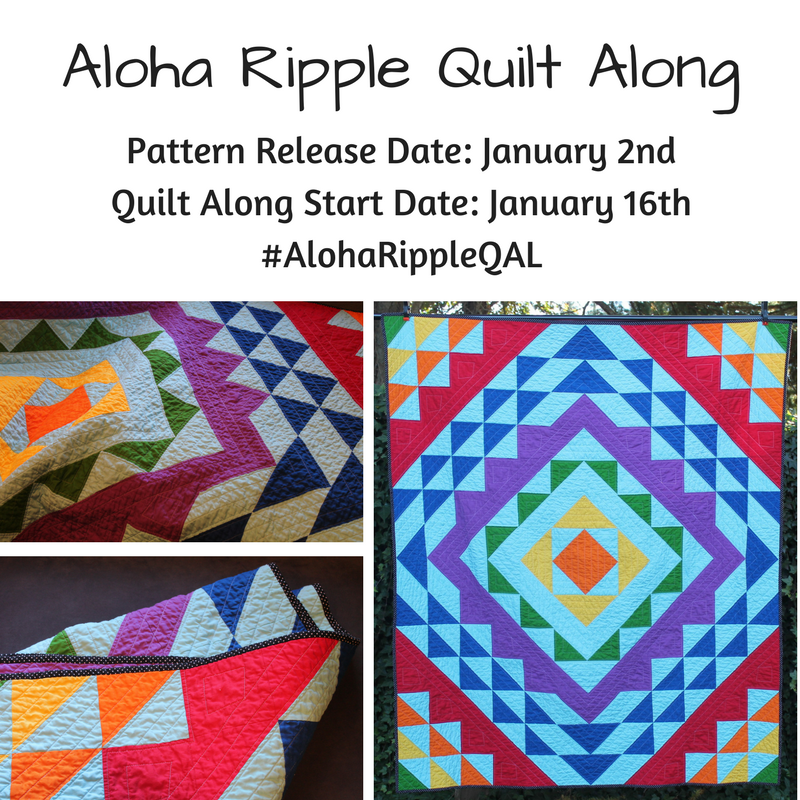
Posted on Leave a comment

Pacific Northwest Plaid Quilt

PacificNorthwestPlaidQuilt (2)
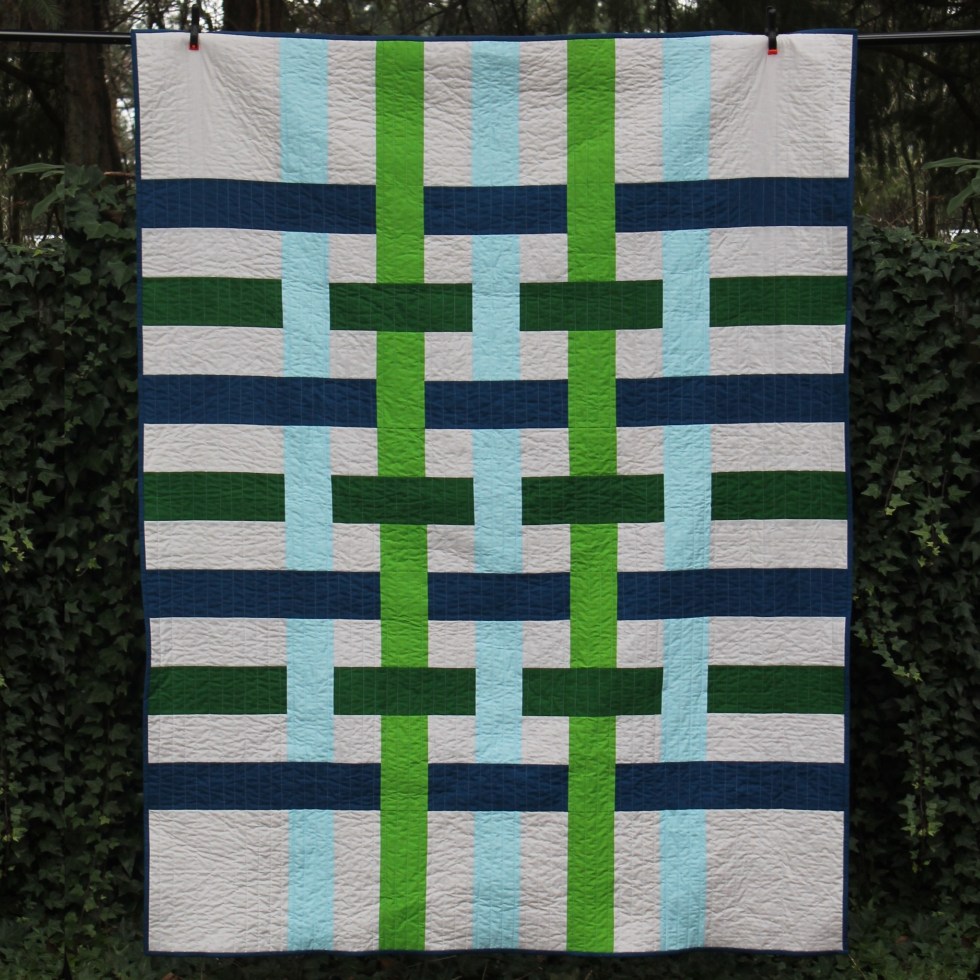
Yay! My Pacific Northwest Plaid Quilt pattern is all finished! I’m super happy with how it turned out!  You can find this quilt pattern in my shop!
DIGITAL DOWNLOAD
PAPER PATTERN
Etsy shop (For customers outside USA)


Earlier this year I gifted my parents one of my Snowy Day Quilt Samplers for their anniversary! After I gave it to them I realized it would be hard for them to share it. My Mom claimed it haha! So I decided I would make my Dad his own quilt.

Growing up my Dad used to always wear those cozy Flannel plaid shirt/coats. So I really wanted to try to design a quilt resembling plaid! Once my design was picked, I went to my trusty Kona Color Card to find the perfect colors. We live in the Pacific Northwest of Washington State. We are surrounding by oceans, lakes, rain (lots and lots of rain), evergreen trees and green grass. So I decided to go with blues and greens and a little bit of silver.  It just so happens that our local sports teams fashion the same colors! Go Seahawks!

From left to right: (All Kona Cotton) Silver, Lake, Jungle, Prussian, and Parrot

pnwfabric

This quilt went together very quickly! The quilt is full of square and rectangles, so once your fabric is cut, it’s block making time. If you are looking for a quilt to make in a weekend, this one’s for you!

I decided to go with a straight line quilting about 1 inch apart. I like the texture it gives once the quilt is washed and dried.

You can find this quilt pattern in my Craftsy and Etsy shops!!

DIGITAL DOWNLOAD
PAPER PATTERN

Etsy (For customer outside the USA. Etsy collect the correct amount of tax and send it to the government.)

I can’t wait to see your version of this quilt!! On social media use the hashtags #pacificnorthwestplaidquilt or #happycloudcreations

Have a wonderful day!

Andrea


Posted on 3 Comments

Block 6 – Stepping Stone Block (Happy Cloud Quilted Pot Holder Quilt Along)

IMG_5275 (2)

Wow! We are already at our last block of our Pot Holder Quilt along!! I love block 6 the Stepping Stone block. This block goes together quickly and is super cute!

When making this block I like to lay out all my pieces to see how the block will be when finished. Then go from there! Make sure to press your seams in an alternating direction so you can nest your seams (so the seams interlock) when sewing it together.

I can’t wait to see all of your creations with these past 6 blocks! Thank you everyone for joining in the fun and making these blocks with me!

DOWNLOAD THE FULL LENGTH PATTERN HERE! Full Length Pattern – Happy Cloud Quilted Pot Holders

I will be filming a LIVE video in the Facebook group tomorrow (Wednesday December 13th) at 10:15am PST. To share tips and answer any questions. You can also share your progress in our Facebook Group!

Click here

I can’t wait to see all of your pretty blocks!! Make sure to post them in the Facebook Group and on Social media you can share using #HCQPotholderQAL

Happy Quilting!
Andrea

Quilt Along Schedule
Oct. 27, 2017 – Week 1 – Fabric requirements and Pot Holder construction directions
Nov 7, 2017 – Week 2 –  Block 1 – Modified Log Cabin
Nov. 14, 2017  – Week 3 – Block 2 – Flying Geese
Nov. 21, 2017 –  Week 4 – Block 3 – Sawtooth Star
Nov. 28, 2017 – Week 5 – Block 4 – Crazy Flying Geese
Dec. 5, 2017 – Week 6 – Block 5 – Diamond in Diamond
Dec. 12, 2017 – Week 7 – Block 6 – Stepping Stone

WATCH THE FACEBOOK LIVE TUTORIAL VIDEO

***

If you like this block, you may like my Stepping Stone Baby Quilt pattern! I made 4 of this baby quilt and plan on connecting them with a extra strip of fabric between to make an almost queen size quilt (87 1/2 x 87 1/2 inches). This will be a family cuddle quilt for our couch! My son’s name is Cloud and daughter’s name is Snow, so I found some cute cloud print and snowflake print fabrics. I’m hoping to finish this one up soon!

You can find my Stepping Stone Baby Quilt pattern in my pattern shop and in my Etsy Shop!

Happy Quilting!
Andrea

IMG_20161225_000132 (2)

Here is the baby size:

IMG_4767 (3)

Posted on 4 Comments

Block 5 – Diamond in Diamond Block (Happy Cloud Quilted Pot Holder Quilt along)

IMG_5240 (2)

Welcome to block 5 of the Happy Cloud Quilted Pot Holder Quilt Along!! Block 5 is a Diamond in Diamond block. This block has a little more steps than the previous blocks, but is still lots of fun! You could always opt to making the center square a plain 4 1/2 x 4 1/2 inch square.

This block is a nice block to change around the color placements to find different designs. It’s also a great block if you like to fussy cut prints. Personally, I’m not great at fussy cutting so I tend to go for a pretty fabric.

You can find out how to make the Flying Geese using the No Waste 4 at 1 time method in the previous blog post.

Block 4 – Crazy Flying Geese

DOWNLOAD THE FULL LENGTH PATTERN HERE: Full Length Pattern – Happy Cloud Quilted Pot Holders

I will be filming a LIVE video in the Facebook group tomorrow (Wednesday Nov. 22nd) at 10:15am PST. To share tips and answer any questions. You can also share your progress in our Facebook Group!

Click here

I can’t wait to see all of your pretty blocks!! Make sure to post them in the Facebook Group and on Social media you can share using #HCQPotholderQAL

Happy Quilting!
Andrea

Quilt Along Schedule
Oct. 27, 2017 – Week 1 – Fabric requirements and Pot Holder construction directions
Nov 7, 2017 – Week 2 –  Block 1 – Modified Log Cabin
Nov. 14, 2017  – Week 3 – Block 2 – Flying Geese
Nov. 21, 2017 –  Week 4 – Block 3 – Sawtooth Star
Nov. 28, 2017 – Week 5 – Block 4 – Crazy Flying Geese
Dec. 5, 2017 – Week 6 – Block 5 – Diamond in Diamond
Dec. 12, 2017 – Week 7 – Block 6 – Stepping Stone

WATCH THE FACEBOOK LIVE TUTORIAL VIDEO

Posted on 5 Comments

Block 4 – Crazy Flying Geese (Happy Cloud Quilted Pot Holder Quilt Along)

IMG_5137 (2)

Welcome to Block 4 of our Happy Cloud Quilted Pot Holder Quilt along! Block 4 is made up of 8 flying geese. You could make 8 flying geese and arrange them how ever you’d like! I decided on this arrangement of them all pointing inward.

With this block I quilted by stitching in the ditch. I felt like It would show off the pattern more if quilted this way.

In the pattern for the Crazy Flying Geese block, we make the Flying Geese with the one at a time method. Some people prefer to make their flying geese with the No Waste – 4 at a time method.

With the No waste 4 at a time method you will need:
Color A: 1 –  5 1/4 x 5 1/4 inch square
Color B: 4 – 2 7/8 x 2 7/8 inch squares
Color C: 1 – 5 1/4 x 5 1/4 inch square
Color D: 4 – 2 7/8 x 2 7/8 inch squares

4 AT 1 TIME GEESE A

1. Take your large square (5 1/4 inch) and 2 small squares ( 2 7/8 inch). Lay the two small squares on opposite corners, right sides of fabric facing each other. Draw a line from one corner to the other diagonally. Pin in place. Sew a scant 1/4 inch from the drawn line on both sides. A scant 1/4 inch seam is a 1/4 inch that includes the width of your needle/thread. Cut down the center line. Press seam out.

4 AT 1 TIME GEESE B2. Lay 1 small square (2 7/8 inch) down in the corner, right sides of fabric facing each other. Draw a line from one corner to the other diagonally. Sew a scant 1/4 inch from your drawn line. Cut down the center and press toward the small triangles. These geese should be 2 1/2 x 4 1/2 inches. Trim if needed.

4 AT 1 TIME GEESE C

Full Length Pattern – Happy Cloud Quilted Pot Holders

I will be filming a LIVE video in the Facebook group tomorrow (Wednesday Nov. 22nd) at 10:15am PST. To share tips and answer any questions. You can also share your progress in our Facebook Group!

Click here

I can’t wait to see all of your pretty blocks!! Make sure to post them in the Facebook Group and on Social media you can share using #HCQPotholderQAL

Happy Quilting!
Andrea

Quilt Along Schedule
Oct. 27, 2017 – Week 1 – Fabric requirements and Pot Holder construction directions
Nov 7, 2017 – Week 2 –  Block 1 – Modified Log Cabin
Nov. 14, 2017  – Week 3 – Block 2 – Flying Geese
Nov. 21, 2017 –  Week 4 – Block 3 – Sawtooth Star
Nov. 28, 2017 – Week 5 – Block 4 – Crazy Flying Geese
Dec. 5, 2017 – Week 6 – Block 5 – Diamond in Diamond
Dec. 12, 2017 – Week 7 – Block 6 – Stepping Stone

WATCH THE FACEBOOK LIVE TUTORIAL VIDEO

Posted on 4 Comments

Block 3 – Sawtooth Star Block (Happy Cloud Quilted Pot Holder Quilt Along)

IMG_5065 (2)

Welcome to Block 3 of our Happy Cloud Quilted Pot holder Quilt along! The Sawtooth Star block is one of my favorites! I love using it in quilts, table runners and placemats and of course in pot holders!

I love how you an showcase a pretty fabric in the center like the block above. I used fabric from the Aviary 2 collection designed by Joel Dewberry for Free Spirit Fabrics.
You could have your center fabric match your outer fabric, like these pot holders I finished below.
I made these using fabric from the Fresh Market collection by Riley Blake Designs. I bound them using a stripe fabric made by Robert Kaufman Fabrics.

IMG_5115 (2)

With the above pot holders I wanted to quilt them to emphasize the star pattern! I quilted them using my walking foot and lined the foot up against the start edge. It’s nice using a walking foot, because it helps pull all of those layers through the machine. If your machine didn’t come with a walking foot it is easy to find one for your machine. You can google your make and model number or go to your manufactures website!

If you have already downloaded the Quilt-A-Long pattern, the block will now be available in your Craftsy account for download.

You can download the full length pattern HERE! Full Length Pattern – Happy Cloud Quilted Pot Holders

I will be filming a LIVE video in the Facebook group tomorrow (Wednesday Nov. 22nd) at 10:15am PST. To share tips and answer any questions. You can also share your progress in our Facebook Group!

Click here

I can’t wait to see all of your pretty blocks!! Make sure to post them in the Facebook Group and on Social media you can share using #HCQPotholderQAL

Happy Quilting!
Andrea

Quilt Along Schedule
Oct. 27, 2017 – Week 1 – Fabric requirements and Pot Holder construction directions
Nov 7, 2017 – Week 2 –  Block 1 – Modified Log Cabin
Nov. 14, 2017  – Week 3 – Block 2 – Flying Geese
Nov. 21, 2017 –  Week 4 – Block 3 – Sawtooth Star
Nov. 28, 2017 – Week 5 – Block 4 – Crazy Flying Geese
Dec. 5, 2017 – Week 6 – Block 5 – Diamond in Diamond
Dec. 12, 2017 – Week 7 – Block 6 – Stepping Stone

WATCH THE FACEBOOK LIVE TUTORIAL VIDEO

Posted on 4 Comments

Block 2 – Flying Geese Block (Happy Cloud Quilted Pot Holder Quilt Along)

IMG_5066 (3)

Welcome to the second block of our Happy Cloud Quilted Pot Holder Quilt-a-long!

Block 2 is a block made up of a bunch of Flying geese. When I was new to quilting I was scared of trying to make flying geese. I’m not sure why I was scared of them….I just figured I’d use half square triangles instead because I knew how to make those. Then one day I decided I’d find out how to make the flying geese block and you know what it wasn’t as hard as I thought it would be!

This is a fun block to show of those pretty fabrics. And it does look better not having a seam down the middle of your flying geese. Just remember to READ all the directions in the pattern and it will be easy peasy!

23213308_1605958249467805_8611359285909546960_o

You can go super scrappy on this block and make each Flying geese with different fabric! Like this block I made using different fabrics from the Fresh Market fabric collection by Riley Blake Fabrics.

IMG_5063 (2)

If you have already downloaded the Quilt-A-Long pattern, the block will now be available in your Craftsy account for download.

If you have not downloaded the Quilt-A-Long pattern yet, you can find it in the first blog post for this quilt along. CLICK HERE

Each Tuesday you will receive an email from Craftsy letting you know the new block is ready to download.

I will be filming a LIVE video in the Facebook group tomorrow (Wednesday Nov. 15th) at 10:15am PST. To share tips and answer any questions. You can also share your progress in our Facebook Group!

Click here

I can’t wait to see all of your pretty blocks!! Make sure to post them in the Facebook Group and on Social media you can share using #HCQPotholderQAL

Happy Quilting!
Andrea

Quilt Along Schedule
Oct. 27, 2017 – Week 1 – Fabric requirements and Pot Holder construction directions
Nov 7, 2017 – Week 2 –  Block 1 – Modified Log Cabin
Nov. 14, 2017  – Week 3 – Block 2 – Flying Geese
Nov. 21, 2017 –  Week 4 – Block 3 – Sawtooth Star
Nov. 28, 2017 – Week 5 – Block 4 – Crazy Flying Geese
Dec. 5, 2017 – Week 6 – Block 5 – Diamond in Diamond
Dec. 12, 2017 – Week 7 – Block 6 – Stepping Stone

WATCH THE TUTORAL VIDEO ON FACEBOOK

Posted on 5 Comments

Block 1 – Modified Log Cabin (Happy Cloud Quilted Pot Holder Quilt Along)

IMG_5159 (2)

This post may contain Affiliate Links. When using the link, you pay the same amount for the items, I just receive a small commission. 

Welcome to the first Block of our Pot Holder Quilt-a-long!

Block 1 is a modified Log Cabin block. I love the simplicity of this block. It makes your pretty fabric shine.

You start your block with the small square and build onto it by adding strips. In a traditional Log Cabin block you would add strips to all four sides of your square. In this block we are only adding strips onto two of the sides. I love how quick and easily this block goes together. The design looks great when adding a loop to the corner.

If you have not downloaded the Quilt-A-Long pattern yet, you can find in the first blog post for this quilt along. CLICK HERE

I will be filming a LIVE video in the Facebook group tomorrow at 10:15am PST. To share tips and answer any questions. You can also share your progress in our Facebook Group!

Click here

I can’t wait to see all of your beautiful blocks. If you are posting on social media use the hashtag #HCQPotholderQA

Happy Quilting!

Andrea

Quilt Along Schedule
Oct. 27, 2017 – Week 1 – Fabric requirements and Pot Holder construction directions
Nov 7, 2017 – Week 2 –  Block 1 – Modified Log Cabin
Nov. 14, 2017  – Week 3 – Block 2 – Flying Geese
Nov. 21, 2017 –  Week 4 – Block 3 – Sawtooth Star
Nov. 28, 2017 – Week 5 – Block 4 – Crazy Flying Geese
Dec. 5, 2017 – Week 6 – Block 5 – Diamond in Diamond
Dec. 12, 2017 – Week 7 – Block 6 – Stepping Stone


Posted on Leave a comment

Pointed Quilt

IMG_4976 (3)Yay! My Pointed Quilt is done! I’ve been seeing a lot of quilts turned on-point and I thought it would be awesome to try to make one myself.

Paper Pattern
Digital Download (USA)
Digital Download (International)

I was trying to design a block that was Fat Quarter friendly. This block is similar to my block 7 of the Snowy Day Quilt Sampler. The block in my Pointed quilt is a little smaller and turned on-point!

Since this block uses different size pieces through out, you must make sure to use an accurate scant 1/4 inch seam. This will ensure that all of your pieces line up correctly.

You can make sure you are using a scant 1/4 inch seam by taking 3 –  2 1/2 x 4 inch strips. Sew them all together lengthwise. The center strip will measure 2 inches wide finished, if you are using a scant 1/4 inch seam.

scant fourth inch

I have been trying to decide on a pattern to use this beautiful Garden Secrets fabric by Sarah Watson for Cloud9 Fabrics. After I drew up my pattern I thought this fabric line would be perfect.

The math for a on-point quilt is a little different than a regular quilt. Once I got my mind wrapped around the idea. It was go time! The quilt goes together pretty quickly.

pointed quilt andrea 2

Once my quilt was all finished I decided to go with a beautiful purple backing fabric. This fabric is Kona Cotton in Gumdrop by Robert Kaufman. I like to use my Kona Color chart to pick out the perfect shade of fabric.

I also found the perfect shade of Cotton Gutterman thread that matches the Ice Frappe Background fabric.

pointed quilt andrea

I decided to quilt this to mimic the points. I usually opt for a straight line quilting, which is much faster. This one took more time, but was totally worth it. I love how it turned out!

IMG_4980 (3)

In an effort to use up my stash, I decided to go with a scrappy binding! I used two fat quarters of the dash print and some scraps of a couple of the other light colored fabrics.20171007_154017

You can download the pattern today!!

PAPER PATTERN

Make sure to use the hashtag #pointedquilt

Happy Quilting!
Andrea

Here are some made by my awesome testers!!

marg sharpe for listingBrittany listing

Cindy (2) listingcindy price kelley (2) listingRoseMassey (2) listingVickie Riches (2) listing

Posted on 1 Comment

Arrows Away Quilt – Free Pattern!!

arrows away (2)

(Pattern Download is at the bottom of this blog post)

This post may contain affiliate links. I may receive commissions from purchases made through links in this post.

Are you looking for a quick an easy quilt? Maybe you have a baby shower coming up. Or you have a son or daughter going to college soon and you want to give them a special gift. Well, this Arrows Away Quilt is perfect for making a super quick, easy and modern quilt!
The first time I made this quilt, was about a year ago. I love using big blocks! It makes the quilt go together super quick. Also, you can show of gorgeous big prints.

IMG_3106

The first throws size version was slightly smaller than the pattern. After research, I found out more people prefer larger size throw than my original version. My research also showed people prefer a rectangle shaped quilt over a square size quilt. So I added a strip of sashing to the top and bottom of the original design to make it more of a rectangle.

IMG_4664 (2)

You can download your FREE Copy here: Arrows Away Quilt Pattern

I’d love to see your Arrows Away quilt! On social media use the hashtag #happycloudcreations

Happy Quilting!
Andrea


Posted on Leave a comment

Lets Make Some Pot Holders…Free Tutorial


IMG_4807 (2)If you love to sew and quilt like I do,  you end up with a bunch of scraps! Well, I know what you can do with all those scraps, make some pot holders! Pot holders are a great way to use up fabric scraps and cotton batting scraps. It’s a great weekend project. They make great house warming gifts or hostess gifts too.

I like to make my pot holders with a layer of Insula-bright (insulated batting that makes them heat resistant) and a layer of cotton batting (for extra protection and to absorb any moisture). When you make pot holders you want to make sure all of your supplies (thread, fabric, and batting) are 100% Cotton. If you use polyester fabric, and they catch fire, the fabric would melt. If cotton fabric catches fire it will just smolder.

Supplies needed:

1 – 8 1/2 x 8 1/2 inch quilt block made of Cotton Fabric

(Strip Block shown below: 4 – 2 1/2 x 9 inch strips)

1 – 10 x 10 inch  piece of Cotton batting

1 – 10 x 10 inch piece of  Insula-bright (Insulated Batting)

1 – 10 x 10 inch piece of  Cotton Fabric

1 – 3 inch x width of fabric (typically 42 inches)

(if you prefer a thinner binding, use a 2 1/2 inch strip)

pot holder 2

First you will need to make your 8 1/2 x 8 1/2 inch quilt block (unfinished size). So you can pick your favorite 8 inch finished quilt block or you can use this super easy Strip block.

Strip Block

Take your 4 – 2 1/2 x 9 inch strips. With right sides of fabric facing each other, sew your strips together to for a block. Press your seams to one side. Then trim your block to measure 8 1/2 x 8 1/2 inches.

Now it’s time to make our Pot Holder!

We will now make our mini quilt sandwich. First lay down your 10 x 10 inch backing fabric down wrong side face up.

Then place your 10 x 10 inch piece of Insula-bright down

Then place your 10 x 10 inch piece of Cotton Batting down

Then place your 8 1/2 x 8 1/2 inch quilt block on top. Pin in place.

pot holder 6

Quilt all four layers together. I like to quilt 1/4 inch from the seams

pot holder 7

Trim down to 8 1/2 x 8 1/2 inches. Sometimes it will end up slightly smaller about 8 1/4 x 8 1/4 inches due to quilting the puffy layers.

pot holder 8

Now you will take your 3 inch x width of fabric strip (about 42 inches). I prefer a large binding on my pot holder. If you want a thinner binding, you can use a 2 1/2 inch wide strip.  On one end fold in about 1 inch. Press wrong sides facing each other. Then fold fabric in half lengthwise,  wrong sides together and press flat.

Match up raw sides of the binding to the raw sides of the front of the pot holder. Take the binding end with the folded over edge, place it on the center of one of the sides. Start sewing your binding on to the front of the pot holder about 1 inch in, use a 3/8 inch seam allowance. Stop when you are 3/8 inch from the corner, backstitch. If your block has points, you may want to use a 1/4 inch seam allowance, so you don’t cut off your points.

Fold your binding up, lining up with the side of your pot holder, then fold it down to line up with the side of your quilt.

Start sewing 3/8 inch from the edge.  When you have reached the beginning point, trim to correct length,  tuck the end of the binding under the beginning of the binding, sew down.

Fold over binding and hand sew to the back or machine sew to the back. I prefer hand sewing my binding, just because I haven’t mastered machine sewing it. Also, it’s nice to have some hand sewing when I’m watching shows.

pot holders finisihing


Yay you have a pretty new pot holder for yourself or a nice gift for a friend! I’d love to see the pot holder you make! Use this hashtag on Instagram: #hccpotholder

Happy Sewing!!
Andrea