Posted on 12 Comments

Aloha Ripple Quilt Along

IMG_5047 (2)

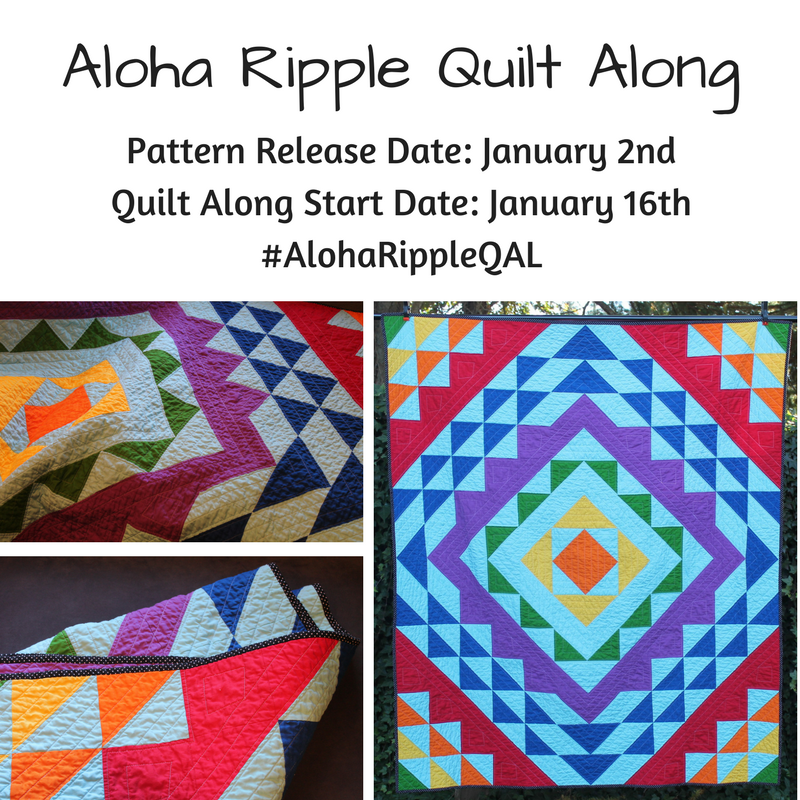
Welcome to the Aloha Ripple Quilt Along!!

I’ve noticed most quilt alongs quilts consist of either sampler blocks or a bunch of the block. So I thought it would be fun to do something different! The Aloha Ripple quilt has a modern over all design, but it is still made with distinct blocks. The blocks are made up of squares, half square triangle and flying geese blocks. Each week we will have a new step of quilt. I will be posting a new blog post each week to go over that weeks step. I will also be filming a live video each week to go over the step and answer any questions in the Facebook Group.

This quilt is perfect for the adventurous beginner to intermediate quilter. It would look great in a variety of fabrics. I would recommend picking a contrasting fabric for the background, so the design pops. The pattern comes with directions for a Baby, Throw and Queen size quilt, so you can decide which size is perfect for you.

CLICK HERE TO DOWNLOAD Aloha Ripple Quilt Pattern

CLICK HERE TO DOWNLOAD King Size Aloha Ripple Quilt – Supplement Updated

Here is the Quilt along Schedule!

Starting January 2nd: Download Pattern – Select your fabric and post a photo!
Week 1: January 16th: Cut fabric
Week 2: January 23rd: Make the Flying Geese
Week 3: January 30th: Make the Half Square Triangles
Week 4: February 6th: Make the Center Block (1)
Week 5: February 13th: Make Corner Blocks A (2)
Week 6: February 20th: Make Corner Blocks B (2)
Week 7: February 27th: Make the Stacked Flying Geese blocks (4)
Week 8: March 6th: Assemble your Quilt Top
Week 9: March 13th: Baste, Quilt and Bind your Quilt!

I’m so excited to see all of your progress during this quilt along! Make sure to post your photo on social media with the hash tag #AlohaRippleQAL or post your photos in the Facebook Group!  CLICK HERE

My original Aloha Ripple Quilt was made for my parents-in-law for their anniversary. I thought they would like a bright and cheerful quilt. They both love visiting Hawaii and the quilt was made with Kona Cotton. So I decided to name the quilt Aloha Ripple!
I quilted the quilt in a straight line fashion mimicking the design. I bound it in a fun black and white dot fabric and backed it with the beautiful purple I used on the front.

Fabrics use in mine: Red, Orange, Canary, Grasshopper, Bahama Blue, Royal, Magenta and Pimatex Basics Pin Dot all by Robert Kaufman

My second Aloha Ripple quilt was a baby size quilt! I wanted to use up some of my stash so I found a bunch of solids that went great together!

If you couldn’t tell, I love Kona Cottons! These are: Grape mist, Aloe, Purrisan, Gumdrop, Ultra Marine, Noble Purple and Medium Grey

I found this awesome fabric from the Black and White Collection by Jennifer Sampou for Robert Kaufman Fabrics. I didn’t have enough of one fabric for the binding, so I decided to use them all!

I’m looking forward to seeing all of your fabric choices and the beautiful quilts you make!

Post your photo on social media with the hash tag #AlohaRippleQAL or post your photos in the Facebook Group!  CLICK HERE

Happy Quilting!
Andrea

Aloha Ripple Quilt Along insta

Posted on 4 Comments

Block 5 – Diamond in Diamond Block (Happy Cloud Quilted Pot Holder Quilt along)

IMG_5240 (2)

Welcome to block 5 of the Happy Cloud Quilted Pot Holder Quilt Along!! Block 5 is a Diamond in Diamond block. This block has a little more steps than the previous blocks, but is still lots of fun! You could always opt to making the center square a plain 4 1/2 x 4 1/2 inch square.

This block is a nice block to change around the color placements to find different designs. It’s also a great block if you like to fussy cut prints. Personally, I’m not great at fussy cutting so I tend to go for a pretty fabric.

You can find out how to make the Flying Geese using the No Waste 4 at 1 time method in the previous blog post.

Block 4 – Crazy Flying Geese

DOWNLOAD THE FULL LENGTH PATTERN HERE: Full Length Pattern – Happy Cloud Quilted Pot Holders

I will be filming a LIVE video in the Facebook group tomorrow (Wednesday Nov. 22nd) at 10:15am PST. To share tips and answer any questions. You can also share your progress in our Facebook Group!

Click here

I can’t wait to see all of your pretty blocks!! Make sure to post them in the Facebook Group and on Social media you can share using #HCQPotholderQAL

Happy Quilting!
Andrea

Quilt Along Schedule
Oct. 27, 2017 – Week 1 – Fabric requirements and Pot Holder construction directions
Nov 7, 2017 – Week 2 –  Block 1 – Modified Log Cabin
Nov. 14, 2017  – Week 3 – Block 2 – Flying Geese
Nov. 21, 2017 –  Week 4 – Block 3 – Sawtooth Star
Nov. 28, 2017 – Week 5 – Block 4 – Crazy Flying Geese
Dec. 5, 2017 – Week 6 – Block 5 – Diamond in Diamond
Dec. 12, 2017 – Week 7 – Block 6 – Stepping Stone

WATCH THE FACEBOOK LIVE TUTORIAL VIDEO

Posted on 5 Comments

Block 4 – Crazy Flying Geese (Happy Cloud Quilted Pot Holder Quilt Along)

IMG_5137 (2)

Welcome to Block 4 of our Happy Cloud Quilted Pot Holder Quilt along! Block 4 is made up of 8 flying geese. You could make 8 flying geese and arrange them how ever you’d like! I decided on this arrangement of them all pointing inward.

With this block I quilted by stitching in the ditch. I felt like It would show off the pattern more if quilted this way.

In the pattern for the Crazy Flying Geese block, we make the Flying Geese with the one at a time method. Some people prefer to make their flying geese with the No Waste – 4 at a time method.

With the No waste 4 at a time method you will need:
Color A: 1 –  5 1/4 x 5 1/4 inch square
Color B: 4 – 2 7/8 x 2 7/8 inch squares
Color C: 1 – 5 1/4 x 5 1/4 inch square
Color D: 4 – 2 7/8 x 2 7/8 inch squares

4 AT 1 TIME GEESE A

1. Take your large square (5 1/4 inch) and 2 small squares ( 2 7/8 inch). Lay the two small squares on opposite corners, right sides of fabric facing each other. Draw a line from one corner to the other diagonally. Pin in place. Sew a scant 1/4 inch from the drawn line on both sides. A scant 1/4 inch seam is a 1/4 inch that includes the width of your needle/thread. Cut down the center line. Press seam out.

4 AT 1 TIME GEESE B
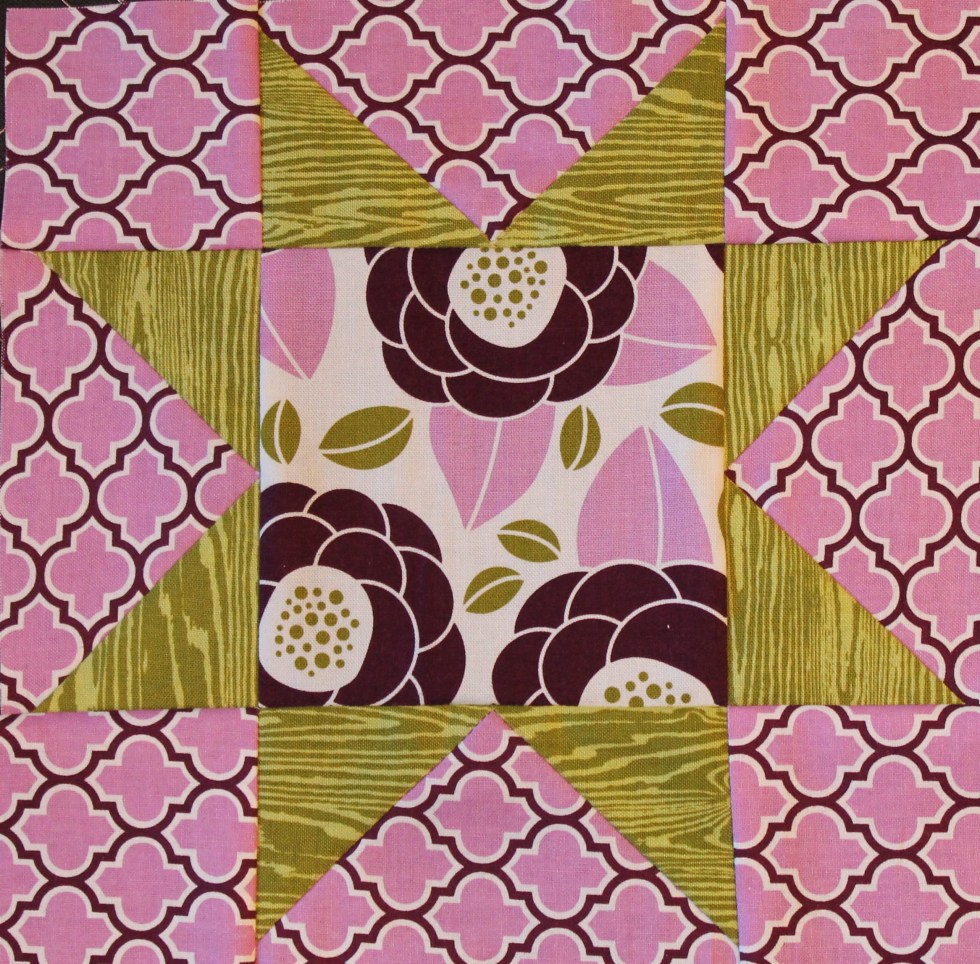
2. Lay 1 small square (2 7/8 inch) down in the corner, right sides of fabric facing each other. Draw a line from one corner to the other diagonally. Sew a scant 1/4 inch from your drawn line. Cut down the center and press toward the small triangles. These geese should be 2 1/2 x 4 1/2 inches. Trim if needed.

4 AT 1 TIME GEESE C

Full Length Pattern – Happy Cloud Quilted Pot Holders

I will be filming a LIVE video in the Facebook group tomorrow (Wednesday Nov. 22nd) at 10:15am PST. To share tips and answer any questions. You can also share your progress in our Facebook Group!

Click here

I can’t wait to see all of your pretty blocks!! Make sure to post them in the Facebook Group and on Social media you can share using #HCQPotholderQAL

Happy Quilting!
Andrea

Quilt Along Schedule
Oct. 27, 2017 – Week 1 – Fabric requirements and Pot Holder construction directions
Nov 7, 2017 – Week 2 –  Block 1 – Modified Log Cabin
Nov. 14, 2017  – Week 3 – Block 2 – Flying Geese
Nov. 21, 2017 –  Week 4 – Block 3 – Sawtooth Star
Nov. 28, 2017 – Week 5 – Block 4 – Crazy Flying Geese
Dec. 5, 2017 – Week 6 – Block 5 – Diamond in Diamond
Dec. 12, 2017 – Week 7 – Block 6 – Stepping Stone

WATCH THE FACEBOOK LIVE TUTORIAL VIDEO

Posted on 4 Comments

Block 3 – Sawtooth Star Block (Happy Cloud Quilted Pot Holder Quilt Along)

IMG_5065 (2)

Welcome to Block 3 of our Happy Cloud Quilted Pot holder Quilt along! The Sawtooth Star block is one of my favorites! I love using it in quilts, table runners and placemats and of course in pot holders!

I love how you an showcase a pretty fabric in the center like the block above. I used fabric from the Aviary 2 collection designed by Joel Dewberry for Free Spirit Fabrics.
You could have your center fabric match your outer fabric, like these pot holders I finished below.
I made these using fabric from the Fresh Market collection by Riley Blake Designs. I bound them using a stripe fabric made by Robert Kaufman Fabrics.

IMG_5115 (2)

With the above pot holders I wanted to quilt them to emphasize the star pattern! I quilted them using my walking foot and lined the foot up against the start edge. It’s nice using a walking foot, because it helps pull all of those layers through the machine. If your machine didn’t come with a walking foot it is easy to find one for your machine. You can google your make and model number or go to your manufactures website!

If you have already downloaded the Quilt-A-Long pattern, the block will now be available in your Craftsy account for download.

You can download the full length pattern HERE! Full Length Pattern – Happy Cloud Quilted Pot Holders

I will be filming a LIVE video in the Facebook group tomorrow (Wednesday Nov. 22nd) at 10:15am PST. To share tips and answer any questions. You can also share your progress in our Facebook Group!

Click here

I can’t wait to see all of your pretty blocks!! Make sure to post them in the Facebook Group and on Social media you can share using #HCQPotholderQAL

Happy Quilting!
Andrea

Quilt Along Schedule
Oct. 27, 2017 – Week 1 – Fabric requirements and Pot Holder construction directions
Nov 7, 2017 – Week 2 –  Block 1 – Modified Log Cabin
Nov. 14, 2017  – Week 3 – Block 2 – Flying Geese
Nov. 21, 2017 –  Week 4 – Block 3 – Sawtooth Star
Nov. 28, 2017 – Week 5 – Block 4 – Crazy Flying Geese
Dec. 5, 2017 – Week 6 – Block 5 – Diamond in Diamond
Dec. 12, 2017 – Week 7 – Block 6 – Stepping Stone

WATCH THE FACEBOOK LIVE TUTORIAL VIDEO

Posted on 4 Comments

Block 2 – Flying Geese Block (Happy Cloud Quilted Pot Holder Quilt Along)

IMG_5066 (3)

Welcome to the second block of our Happy Cloud Quilted Pot Holder Quilt-a-long!

Block 2 is a block made up of a bunch of Flying geese. When I was new to quilting I was scared of trying to make flying geese. I’m not sure why I was scared of them….I just figured I’d use half square triangles instead because I knew how to make those. Then one day I decided I’d find out how to make the flying geese block and you know what it wasn’t as hard as I thought it would be!

This is a fun block to show of those pretty fabrics. And it does look better not having a seam down the middle of your flying geese. Just remember to READ all the directions in the pattern and it will be easy peasy!

23213308_1605958249467805_8611359285909546960_o

You can go super scrappy on this block and make each Flying geese with different fabric! Like this block I made using different fabrics from the Fresh Market fabric collection by Riley Blake Fabrics.

IMG_5063 (2)

If you have already downloaded the Quilt-A-Long pattern, the block will now be available in your Craftsy account for download.

If you have not downloaded the Quilt-A-Long pattern yet, you can find it in the first blog post for this quilt along. CLICK HERE

Each Tuesday you will receive an email from Craftsy letting you know the new block is ready to download.

I will be filming a LIVE video in the Facebook group tomorrow (Wednesday Nov. 15th) at 10:15am PST. To share tips and answer any questions. You can also share your progress in our Facebook Group!

Click here

I can’t wait to see all of your pretty blocks!! Make sure to post them in the Facebook Group and on Social media you can share using #HCQPotholderQAL

Happy Quilting!
Andrea

Quilt Along Schedule
Oct. 27, 2017 – Week 1 – Fabric requirements and Pot Holder construction directions
Nov 7, 2017 – Week 2 –  Block 1 – Modified Log Cabin
Nov. 14, 2017  – Week 3 – Block 2 – Flying Geese
Nov. 21, 2017 –  Week 4 – Block 3 – Sawtooth Star
Nov. 28, 2017 – Week 5 – Block 4 – Crazy Flying Geese
Dec. 5, 2017 – Week 6 – Block 5 – Diamond in Diamond
Dec. 12, 2017 – Week 7 – Block 6 – Stepping Stone

WATCH THE TUTORAL VIDEO ON FACEBOOK

Posted on 1 Comment

Arrows Away Quilt – Free Pattern!!

arrows away (2)

(Pattern Download is at the bottom of this blog post)

This post may contain affiliate links. I may receive commissions from purchases made through links in this post.

Are you looking for a quick an easy quilt? Maybe you have a baby shower coming up. Or you have a son or daughter going to college soon and you want to give them a special gift. Well, this Arrows Away Quilt is perfect for making a super quick, easy and modern quilt!
The first time I made this quilt, was about a year ago. I love using big blocks! It makes the quilt go together super quick. Also, you can show of gorgeous big prints.

IMG_3106

The first throws size version was slightly smaller than the pattern. After research, I found out more people prefer larger size throw than my original version. My research also showed people prefer a rectangle shaped quilt over a square size quilt. So I added a strip of sashing to the top and bottom of the original design to make it more of a rectangle.

IMG_4664 (2)

You can download your FREE Copy here: Arrows Away Quilt Pattern

I’d love to see your Arrows Away quilt! On social media use the hashtag #happycloudcreations

Happy Quilting!
Andrea


Posted on 6 Comments

Snowy Day Quilt Sampler Block Challenge

SDQS - QuiltCLICK HERE TO DOWNLOAD: Snowy Day Quilt Sampler Pattern

Recently my Snowy Day Quilt Sampler was used in the National Quilters Circle Block Challenge! Over 24,000 signed up for the challenge and over 17,000 joined the Facebook Group.

It was a lot of fun meeting and interacting with all of these wonderful quilters. Seeing all of the Beautiful fabric and color combinations, makes me want to make more and more quilts.

The National Quilters Circle did a great job getting all these wonderful quilters together to make this quilt. I am so happy I had the opportunity to be part of it. You can see the Block Challenge recap by clicking here. I list a few of my favorite quilts from the challenge! There were so many beautiful quilts to choose from!

SDQS 6

I chose to go with straight ‘organic’ line quilting! It’s quick, easy and I love the texture it give the quilt!

When you use cotton batting your quilt will shrink 3% when you wash and dry it. It will get all nice and crinkled and it has a wonderful texture.

I used Macramé fabric by Rashida Coleman-Hale of  Cotton+Steel in the quilt I made for the pattern!  I love this fabric so much, I am also using it in my NEW Happy Flower Garden Quilt. The pattern will be coming out June 1, 2017! Yay! Stay tuned for photos!

During the block challenge I made two quilt tops with the group! My first quilt top was made with a mixture of Up Parasol and Clementine fabric by Heather Bailey for Free Spirit Fabrics.

2ndquilt

I loved how the blocks turned out! But there seemed to be a lot of pink. So I decided to add a pink border around each block. Then I added a scrappy teal/aqua sashing in between all of the blocks. I gifted this quilt to my parents for their 41st Anniversary!

The second quilt I made during the challenge was made with a variety of Cotton +Steel fabrics. I love how they all go so well together, even though they are from different designers.

Sprinkle by Sarah Watts, Cookie Book by Kim Kight and Paper Bandana by Alexia Marcelle Abeg

1stquilt

I tried to make this a little different than my other two quilts. I did a border in white around each of the blocks and then I did a navy Paper Bandana sashing with the Red Sprinkle cornerstones. I’m excited to finish this one. I bought some Kona Cotton in Baby pink for the backing fabric.

snowydayquiltsampler

You can follow me on Facebook and Instagram to see the new patterns I’m working on!

Happy Quilting!

Andrea